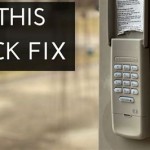
Why My Garage Door Is Not Closing
A malfunctioning garage door can present a significant inconvenience and security concern. A door that refuses to close properly leaves the garage vulnerable to intruders, pests, and the elements. Troubleshooting the reasons why a garage door is not closing requires a systematic approach, examining various components and functionalities of the system. This article will explore several common causes contributing to this problem and provide guidance on identifying and addressing each issue.
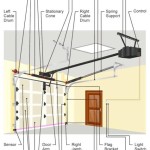
The garage door system is more complex than it might appear at first glance. It involves a network of mechanical and electrical components working in concert. Understanding these components and their interdependencies is crucial in diagnosing the root cause of a closing failure. Before attempting any repairs, it is essential to disconnect the power supply to the garage door opener to prevent accidental electrocution or injury.
1. Obstructions Blocking the Safety Sensors
One of the most common reasons a garage door will not close is due to an obstruction interfering with the safety sensors. These sensors, typically located near floor level on either side of the door opening, are designed to prevent the door from closing if anything is in its path. They operate on an infrared beam; when the beam is broken, the opener interprets this as an obstruction and reverses the door's direction.
The first step is to visually inspect the area around the sensors. Look for any objects that might be blocking the beam, such as boxes, tools, or even debris like leaves or dirt. Once any visible obstructions are removed, check the sensors themselves for dirt, dust, or spiderwebs. Clean the sensor lenses with a soft cloth to ensure a clear line of sight.
If the sensors appear clean and unobstructed, verify their alignment. Misaligned sensors are a frequent cause of this issue. Each sensor should be pointing directly at the other. Many models have small indicator lights that illuminate when the sensors are properly aligned. If the light is off or flickering, gently adjust the sensor's position until the light is steady. The mounting brackets holding the sensors may have become loose or bent; ensure they are securely fastened and properly aligned.
Another potential issue is a wiring problem with the safety sensors. Inspect the wires connecting the sensors to the garage door opener for any signs of damage, such as cuts, fraying, or loose connections. If any damage is found, the wires may need to be repaired or replaced. If the wiring appears intact, use a multimeter to test the continuity of the wires and ensure they are conducting electricity properly. If you are uncomfortable working with electrical wiring, it is best to consult a qualified electrician.
Finally, consider the possibility of a faulty sensor. Even if the sensors appear to be properly aligned and wired, one or both sensors may be malfunctioning. The best way to test this is to temporarily bypass the sensors (consult the owner’s manual before doing so, as bypassing the safety feature can be dangerous). If the door closes when the sensors are bypassed, then one or both sensors need to be replaced. It is generally recommended to replace both sensors at the same time to ensure consistent operation.
2. Issues with the Limit Switches
Limit switches are crucial components in the garage door operating system. They control how far the door opens and closes. They essentially tell the motor when to stop, preventing the door from overtraveling and potentially causing damage. If the limit switches are improperly adjusted or malfunctioning, the door may not close completely or may reverse direction before closing.
The limit switches are typically located on the garage door opener motor unit. They are often small dials or screws that can be adjusted to increase or decrease the travel distance of the door. Most garage door openers have separate adjustments for the opening and closing limits. The owner's manual will provide specific instructions on how to adjust these settings for the particular model.
If the closing limit is set too high, the door will stop before it reaches the ground. Conversely, if the closing limit is set too low, the door may close too far and strain the motor or cause damage to the door itself. To adjust the closing limit, use a screwdriver to turn the adjustment screw in small increments. Test the door after each adjustment to see if the problem is resolved. Be patient and make small, incremental adjustments, as over-adjusting can lead to further problems.
Sometimes, the limit switches themselves can fail. If the door consistently stops at the same point, and adjusting the limit switch does not resolve the issue, the switch may be defective. A multimeter can be used to test the continuity of the limit switch. If the switch does not show continuity when it should, it needs to be replaced. Again, refer to the owner's manual for the proper procedure for replacing the limit switches.
Environmental factors can also affect limit switch performance. Extreme temperatures or humidity can sometimes cause the switches to malfunction or become less responsive. Regularly inspecting the limit switches for signs of corrosion or damage is a good preventative measure. Applying a small amount of lubricant to the switch components may also help to improve their performance.
3. Problems with the Garage Door Opener Logic Board
The logic board is the brain of the garage door opener. It controls all the functions of the opener, including the motor, the safety sensors, and the remote controls. A malfunctioning logic board can cause a wide range of problems, including the door not closing properly.
Diagnosing a logic board issue can be challenging, as the symptoms can be similar to those caused by other problems. Common signs of a failing logic board include inconsistent operation, random opening and closing of the door, and the inability to program remote controls. If the garage door opener is exhibiting these symptoms, and other potential causes have been ruled out, the logic board is a likely culprit.
Before replacing the logic board, it is crucial to ensure that the problem is not due to a simpler issue, such as a loose wire or a power surge. Inspect the wiring connections to the logic board for any signs of damage or corrosion. Ensure that the power supply to the opener is stable and that there are no voltage fluctuations. Power surges can damage the logic board, so consider installing a surge protector to protect the opener.
Replacing the logic board is a more complex repair that typically requires some technical expertise. The first step is to disconnect the power supply to the opener. Then, carefully remove the old logic board, taking note of the wiring connections. Install the new logic board, ensuring that all the wires are connected correctly. Refer to the owner's manual or a wiring diagram for guidance. Once the new logic board is installed, reconnect the power supply and test the opener.
If replacing the logic board does not resolve the problem, the issue may lie elsewhere within the opener’s motor assembly. In some cases, it may be more cost-effective to replace the entire garage door opener rather than attempting further repairs. A professional garage door technician can assess the situation and provide recommendations.
4. Issues with the Garage Door Springs and Hardware
While the opener itself is responsible for automating the process, the physical mechanics of the door are critical for proper operation. Garage door springs, cables, rollers, and other hardware components work together to ensure the door moves smoothly and evenly. If any of these components are damaged, worn, or improperly adjusted, the door may bind or become difficult to close.
Garage door springs are under significant tension and can be dangerous to work with. If a spring is broken or damaged, it should only be replaced by a qualified professional. Attempting to replace a spring without the proper tools and knowledge can result in serious injury.
Inspect the garage door cables for any signs of fraying, kinking, or damage. Damaged cables can prevent the door from closing properly and may eventually snap, causing the door to fall. If the cables are damaged, they should be replaced immediately by a professional. The cables work in conjunction with the springs to lift and lower the door, and replacing them requires specialized knowledge and equipment.
The rollers are responsible for guiding the door along the tracks. Over time, the rollers can become worn or damaged, causing the door to bind or squeak. Inspect the rollers for wear and tear, and replace any damaged rollers. Lubricating the rollers and tracks with a silicone-based lubricant can also help to improve their performance and reduce friction.
The tracks themselves should also be inspected for any signs of damage or misalignment. Bent or misaligned tracks can prevent the door from closing properly. Use a level to check the alignment of the tracks, and adjust them as necessary. If the tracks are severely damaged, they may need to be replaced.
Finally, check the hinges that connect the sections of the door. Loose or damaged hinges can cause the door to bind and prevent it from closing. Tighten any loose hinges, and replace any damaged hinges. Lubricating the hinges can also help to improve their performance.
By systematically examining these possible causes, homeowners can methodically diagnose why their garage door is not closing. While some repairs can be undertaken by homeowners with basic mechanical skills, others, particularly those involving springs or electrical components, should be left to qualified professionals to ensure safe and effective resolution of the problem.

Garage Door Not Closing All The Way Down Easy Adjustment

How To Repair A Garage Door When It Won T Close

Garage Door Won T Close Homepro Inspections

Garage Door Not Closing Easy Fix

Why Your Garage Door Won T Close On One Side Whitby Doors

Garage Door Wont Close 4 Easy Fixes And Reasons Why The Is Not Closing

Garage Door Won T Close And Light Flashes How To Fix Easy

How To Troubleshoot A Garage Door The Home

5 Reasons Your Garage Door Won T Close And What To Do Waypoint Inspection

Why Is My Garage Door Not Closing Triple B Doors And Gates