Why Your Garage Door Won't Close: Common Causes and Solutions
A malfunctioning garage door can be a significant inconvenience and, more importantly, a security risk. When a garage door refuses to close, it disrupts daily routines, potentially exposing the contents of the garage to theft or the elements. Understanding the common reasons behind this issue is crucial for effective troubleshooting and timely repairs.
This article aims to provide a comprehensive overview of the various factors that can prevent a garage door from closing. It will explore the mechanical, electrical, and sensor-related problems that commonly contribute to this issue, alongside actionable steps for addressing them. While some solutions may be within the scope of a reasonably handy homeowner, others necessitate the expertise of a qualified garage door technician.
Obstructions Blocking the Safety Sensors
Garage doors are equipped with safety sensors positioned near the floor on either side of the opening. These sensors are designed to prevent the door from closing if an obstruction is detected in its path. The sensors work by emitting an infrared beam across the doorway. If the beam is interrupted, the garage door opener will reverse direction or refuse to close altogether. This is a crucial safety feature designed to protect people, pets, and objects from being crushed or damaged by the closing door.
The most common reason for a garage door refusing to close due to the safety sensors is a simple obstruction. This could be anything from a stray leaf or piece of debris to a tool or toy that has been inadvertently left in the doorway. Even minor obstructions can interfere with the infrared beam and trigger the safety mechanism.
Another frequent cause is misaligned sensors. If the sensors are not properly aligned, the infrared beam may not be able to reach the receiver, leading to a false obstruction reading. This can happen if the sensors have been bumped, shifted, or if the mounting brackets have become loose. Signs of misalignment often include a flashing light on one or both of the sensor units.
Furthermore, the sensors themselves can become dirty or damaged, affecting their functionality. Dust, dirt, and cobwebs can accumulate on the sensor lenses, obscuring the infrared beam. Physical damage, such as cracks or breaks in the sensor housing, can also render the sensors inoperable.
To troubleshoot sensor-related problems, begin by visually inspecting the area around the sensors. Remove any obstructions that might be blocking the infrared beam. Next, check the alignment of the sensors. Ensure that they are facing each other and that the mounting brackets are secure. If necessary, carefully realign the sensors until the indicator lights on both units are solid and no longer flashing. Clean the sensor lenses with a soft, dry cloth to remove any dirt or debris. If the sensors appear to be damaged, they may need to be replaced.
If these basic troubleshooting steps do not resolve the issue, the problem may lie with the sensor wiring. Check the wiring connections to ensure that they are secure and that there are no loose or frayed wires. If you are comfortable working with electrical wiring, you can use a multimeter to test the voltage at the sensor terminals. However, if you are not experienced with electrical work, it is best to consult a qualified electrician or garage door technician.
Issues with the Limit Switches
Limit switches are mechanical or electronic components within the garage door opener that control the distance the door travels when opening and closing. They essentially tell the motor when to stop, preventing the door from overshooting or undershooting its intended positions. These switches are vital for the smooth and reliable operation of the garage door.
If the limit switches are improperly adjusted, the garage door may not close completely. If the "down" limit switch is set too high, the door will stop before reaching the ground, leaving a gap. Conversely, if the limit switch is set too low, the door may continue to try to close even after it has reached the ground, putting strain on the motor and potentially damaging the door or the opener mechanism.
Over time, limit switches can also become worn or damaged. The mechanical components of the switch may break down, or the electrical contacts may become corroded. This can lead to erratic behavior, such as the door stopping at random points or failing to respond to the opener at all.
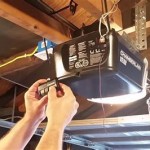
Adjusting limit switches typically involves using a screwdriver to turn adjustment screws located on the garage door opener unit. The screws are usually labeled with markings indicating the direction of adjustment for the "up" and "down" limits. Refer to the garage door opener's owner's manual for specific instructions on how to adjust the limit switches for your model. It is crucial to make small adjustments and test the door's operation after each adjustment to avoid overshooting the desired settings.
If the limit switches are faulty, they will need to be replaced. Replacement limit switches are typically available from garage door parts suppliers or online retailers. Be sure to purchase the correct type of limit switch for your garage door opener model. The replacement process involves removing the old limit switch and installing the new one in its place. Be sure to disconnect the power to the garage door opener before attempting to replace the limit switches.
When replacing or adjusting limit switches, it is also important to inspect the wiring connections. Make sure that the wires are securely connected to the terminals and that there are no loose or frayed wires. If the wiring is damaged, it may need to be repaired or replaced.
Problems with the Garage Door Opener
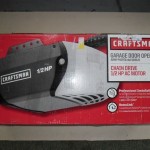
The garage door opener is the central component responsible for controlling the movement of the garage door. It consists of a motor, a drive mechanism (chain, belt, or screw), and electronic controls. Any malfunction within the garage door opener can prevent the door from closing.
A common issue is a malfunctioning motor. Over time, the motor can wear out or become damaged, resulting in insufficient power to operate the door. Signs of a failing motor include unusual noises, slow or erratic movement, and eventual failure to respond at all. Motor issues can also stem from problems within the motor's internal components, such as the start capacitor or winding.
The drive mechanism, whether it's a chain, belt, or screw, is responsible for transferring the motor's power to the garage door. These mechanisms can wear down or become damaged over time. Chains can become loose or broken, belts can fray or snap, and screws can become bent or stripped. A damaged drive mechanism will hinder the door's ability to open and close smoothly, and may ultimately prevent it from closing completely.
The electronic controls within the garage door opener are responsible for interpreting signals from the remote control, wall button, and safety sensors. These controls can malfunction due to power surges, electrical damage, or component failure. A malfunctioning control board can lead to erratic behavior, such as the door opening or closing unexpectedly, or refusing to respond to commands.
Troubleshooting garage door opener problems often involves a process of elimination. First, ensure that the opener is receiving power. Check the circuit breaker to make sure it has not tripped. Next, inspect the motor for any signs of damage or unusual noises. Listen for humming or clanking sounds that could indicate a motor problem. Examine the drive mechanism for any signs of wear or damage. Check the chain or belt for looseness, frays, or breaks. Inspect the screw for bends or stripped sections.
If the motor is suspected to be the problem, it may need to be replaced. Replacing a garage door opener motor is a complex task that typically requires specialized tools and knowledge. It is generally recommended to consult a qualified garage door technician for motor replacement. If the drive mechanism is damaged, it may need to be repaired or replaced. Chains and belts can often be replaced relatively easily, but screw drive mechanisms may require more extensive repairs. If the electronic controls are malfunctioning, the control board may need to be replaced. Control board replacement can be a complex task that requires careful attention to detail. Be sure to disconnect the power to the garage door opener before attempting any repairs or replacements.
If these solutions don't solve the problem, it is recommended to contact a professional garage door technician to inspect and repair the garage door opener.

Why Your Garage Door Won T Close And How To Fix It Champion Repair

Garage Door Won T Close How To Fix Quickly Youtube

12 Reasons Why Your Garage Door Won T Close What To Do

Garage Door Won T Close Overhead Company 7 Rivers Region

Garage Door Not Closing All The Way Down Easy Adjustment

Garage Door Won T Close All The Way Here S How To Fix It Family Handyman

Garage Door Won T Close Homepro Inspections

Why Your Garage Door Won T Close On One Side Whitby Doors

12 Reasons Why Your Garage Door Won T Close What To Do

Garage Door Not Closing Easy Fix