Reprogramming Legacy Garage Door Openers: A Comprehensive Guide
Garage door openers, essential components of modern home convenience and security, have evolved significantly over the decades. While newer models boast advanced features like smartphone connectivity and enhanced security protocols, many homes still rely on legacy garage door openers installed years ago. Reprogramming these older devices is a crucial skill for homeowners who may need to update their remote controls, address security concerns, or integrate new accessories. This article provides a comprehensive guide to reprogramming legacy garage door openers, covering the necessary tools, common procedures, and troubleshooting tips.
Understanding Legacy Garage Door Opener Technology
Legacy garage door openers, typically those manufactured before the mid-1990s, often utilize dip switch technology for programming. Dip switches are small, physical switches located on both the garage door opener unit and the remote control. The position of these switches—either up or down—determines the security code. If the codes between the opener and the remote don't match, the remote will not activate the garage door. Later legacy systems and some models from the late 1990s and early 2000s employed "learn button" technology, a more convenient alternative to dip switches. These buttons allow remotes to be programmed directly to the opener's memory. The specific model and brand dictate the exact method used for programming.
Before attempting any reprogramming, it is imperative to identify the type of system in place. Consult the garage door opener's manual; if unavailable, the model number, usually found on the opener unit itself, can be used to search for a digital version online. Identifying the manufacturer (e.g., LiftMaster, Chamberlain, Genie, Sears Craftsman) is also crucial as reprogramming procedures vary across brands. Knowing the operating frequency (commonly 390MHz, 315MHz, or a dual-frequency system) is helpful when purchasing replacement remotes.
Failure to correctly identify the system can result in frustration and potentially damage the opener or remote. Spending time researching the specific model is a worthwhile investment, making the reprogramming process much smoother and more efficient.
Dip Switch Programming: A Step-by-Step Guide
Dip switch programming, while seemingly archaic, remains a functional method for many older garage door openers. The fundamental principle involves matching the dip switch settings on the remote control with those on the garage door opener unit. This creates a unique code that allows the remote to communicate with and activate the opener.
The following steps outline the process of dip switch programming:
1.
Safety First:
Disconnect the garage door opener from its power source. This prevents accidental activation during the programming process, ensuring personal safety and preventing damage to the door or its components.2.
Locate the Dip Switches:
Identify the dip switch compartments on both the garage door opener unit and the remote control. They are usually found under a removable cover or panel. On the opener unit, it's typically on the back or side of the motor housing. On the remote, it might be under the battery cover or behind a small access panel.3.
Record Existing Settings:
Before making any changes, carefully note the current position of each dip switch on the garage door opener unit. This serves as a reference point, allowing a return to the original configuration if needed. A photograph or a written record is beneficial.4.
Match the Remote Settings:
Adjust the dip switches on the remote control to precisely match the settings on the garage door opener unit. Each switch should be in the same position (either up or down) as its corresponding switch on the opener. A small screwdriver or pen tip may be required to move the switches.5.
Restore Power and Test:
Reconnect the garage door opener to its power source. Test the remote control to verify that it correctly activates the garage door. If the door does not respond, double-check the dip switch settings, ensuring accuracy and alignment. It's possible that a switch might not have fully engaged in the desired position.6.
Troubleshooting:
If the remote still fails to operate the garage door, consider the following troubleshooting steps: *Battery Check:
Ensure the remote control's battery is fresh and properly installed. *Switch Integrity:
Inspect the dip switches for damage or corrosion that could prevent proper contact. *Proximity:
Ensure the remote is within the operational range of the garage door opener. *Interference:
Check for sources of radio frequency interference that could disrupt the signal. *Reseat Switches:
Try reseating each dip switch, ensuring it is firmly in either the up or down position.Dip switch programming demands meticulous attention to detail. Even a single misplaced switch can prevent the remote from functioning. Patience and careful verification are key to successful reprogramming.
Learn Button Programming: A Simpler Approach
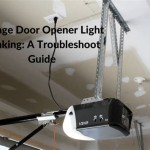
Garage door openers equipped with a "learn button" offer a more streamlined programming experience compared to dip switch systems. The learn button, typically a colored button (often yellow, red, orange, or purple) located on the garage door opener unit, initiates a brief window of time during which the opener can learn the code transmitted by the remote control.
The following steps detail the learn button programming procedure:
1.
Safety First:
As with dip switch programming, disconnect the garage door opener from its power source before beginning. This prevents accidental activation and ensures safety.2.
Locate the Learn Button:
Identify the learn button on the garage door opener unit. Consult the user manual for the specific location, as it can vary depending on the model. It's usually found on the back or side of the motor housing, near the antenna.3.
Press the Learn Button:
Press and release the learn button. A small LED indicator light, usually located near the button, will illuminate, signaling that the opener is in learning mode. This learning mode typically lasts for a limited time, usually 30 seconds.4.
Activate the Remote:
Within the designated timeframe, press and hold the button on the remote control that needs to be programmed. Continue holding the button until the garage door opener's light flashes, or the garage door moves slightly. This indicates that the opener has successfully learned the remote's code.5.
Test the Remote:
After the garage door opener signals successful programming, test the remote control to verify that it correctly activates the garage door. If the door does not respond, repeat steps 3 and 4, ensuring the remote button is held down consistently throughout the learning process.6.
Multiple Remotes:
To program additional remotes, repeat steps 3 and 4 for each remote. The garage door opener can typically store a limited number of remote codes in its memory. Refer to the user manual for the maximum number of remotes supported.7.
Troubleshooting:
If programming fails, consider these troubleshooting points: *Time Limit:
Ensure the remote button is pressed within the allotted time frame after pressing the learn button. *Remote Compatibility:
Verify that the remote control is compatible with the garage door opener's frequency and security protocol. Not all remotes are universally compatible. *Button Functionality:
Check that the remote control button is functioning correctly. Try programming a different button on the remote, if available. *Interference:
Minimize potential sources of radio frequency interference. *Resetting the Opener:
If persistent issues arise, consult the user manual for instructions on resetting the garage door opener's memory and starting the programming process from scratch.Learn button programming is generally more user-friendly than dip switch programming. However, it's essential to understand the specific steps and timing requirements for the particular garage door opener model to ensure successful programming.
Addressing Security Concerns and Rolling Code Technology
Legacy garage door openers, particularly those employing dip switch technology, are inherently vulnerable to security breaches. The fixed code generated by dip switches can be intercepted and replicated, allowing unauthorized access to the garage. This vulnerability underscores the importance of upgrading to a more secure garage door opener system, especially in areas with high crime rates.
Rolling code technology, also known as code hopping, addresses this security flaw. Garage door openers with rolling code technology generate a new, randomly selected code each time the remote is activated. This prevents code interception and replication, significantly enhancing security. Most modern garage door openers utilize rolling code technology.
While some legacy systems may not be upgradable to rolling code, certain universal remote controls offer enhanced security features. These remotes may employ frequency hopping or encryption techniques to improve security, even with older garage door opener models. However, the level of security provided by these universal remotes may not be as robust as a true rolling code system.
Homeowners concerned about garage door security should consider the following measures:
*
Upgrade to a Modern Opener:
Replacing a legacy garage door opener with a modern model equipped with rolling code technology is the most effective way to enhance security.*
Keypad Entry:
Install a keypad entry system that requires a PIN code to open the garage door. This provides an additional layer of security and eliminates the need for a physical remote control.*
Regularly Change Dip Switch Settings:
For dip switch systems, periodically change the dip switch settings to generate a new code. While this doesn't eliminate the vulnerability, it reduces the risk of unauthorized access using a previously intercepted code.*
Monitor Garage Door Activity:
Consider installing a smart garage door opener with smartphone connectivity, allowing for remote monitoring of garage door activity and real-time alerts if the door is opened unexpectedly.*
Physical Security Measures:
Reinforce the garage door itself with stronger materials and secure the garage door opener's emergency release mechanism to prevent unauthorized access.Prioritizing garage door security is crucial for protecting homes and belongings. While legacy systems may offer basic functionality, they often lack the advanced security features of modern garage door openers. Evaluating security needs and implementing appropriate measures is a vital step in ensuring home safety.

Programming Travel Force Limit Overhead Legacy Phantom

How To Program A New Code For Your Garage Door Keypad

How To Program A Remote Garage Door Opener Odyssey Destiny Openers Codedodger 1

Program Remote For Overhead Door Legacy 696 Cd B

How To Reset A Legacy Overhead Garage Door 696cd B Youtube

How To Program A Garage Door Remote Control Keypad And Homelink Ohd Kansas City

How To Program A Remote Garage Door Opener Odyssey Destiny Openers Codedodger 2

Dad Changes The Code On Garage Keypad Overhead Door

Ohd Legacy Garage Door Opener Youtube

Overhead Door Legacy Programming Instructions
See Also