Programming Universal Garage Door Opener
Garage door openers provide convenience and security for homes and businesses. Universal garage door openers offer the flexibility to work with various garage door brands and models, making them a versatile option for many properties.
Programming a universal garage door opener involves following a specific sequence of steps to establish communication between the opener and the garage door's receiver. While the exact steps may vary slightly depending on the specific opener model, the general process remains similar.
Materials Required:
- Universal garage door opener
- Extension ladder (if necessary)
- Screwdriver or drill
- Programming instructions (provided with the opener)
Step-by-Step Programming Instructions:
- Disconnect Power: Safety first! Disconnect power to the garage door opener at the breaker panel.
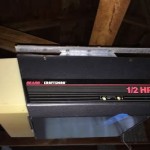
- Mount the Opener: Choose an appropriate location on the ceiling or wall for the opener. Securely mount it using the provided hardware.
- Connect Wiring: Connect the opener's wiring according to the provided instructions. Ensure proper connections to the motor, sensors, and push-button.
- Restore Power: Turn the power back on at the breaker panel.
- Clear Existing Memory: Most openers come with existing codes stored in their memory. Clear these codes to prevent any interference.
- Enter Programming Mode: Refer to the opener's instructions for the specific steps to enter programming mode. This usually involves pressing a button on the opener or remote.
- Program Remote: With the opener in programming mode, press and hold the desired button on the remote until the opener's indicator light flashes or beeps.
- Test Operation: Once programmed, test the remote by pressing the button. The garage door should open or close accordingly.
- Set Limit Switches: Adjust the limit switches to determine the desired travel range of the garage door.
- Install Safety Features: Install any required safety features, such as safety sensors or an automatic closing timer.
Tips:
- Use a ladder that is tall enough to reach the mounting location comfortably.
- Check for obstructions before mounting the opener.
- Follow the programming instructions carefully to avoid errors.
- Test the operation thoroughly to ensure proper functionality.
Additional Considerations:
- If you encounter any difficulties during programming, consult the opener's user manual or contact the manufacturer for assistance.
- Consider hiring a qualified electrician or garage door technician for professional installation and programming, especially for complex or high-security systems.
- Regularly test the garage door opener's operation and inspect its components for wear or damage.

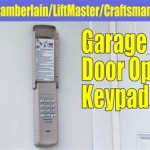
How To Program A Universal Garage Door Opener Keypad

How To Program A Universal Garage Door Remote

How To Program A Universal Garage Door Opener Remote

How To Program A Garage Door Opener Car Autozone

Programming Chamberlain Klik3u Universal Garage Door Opener With Overhead Brand

How To Program A Chamberlain Clicker Universal Remote Control Liftmaster 375

How To Program Chamberlain S Universal Remote Control Model Klik3u A Garage Door Opener

Universal 4 Buttons Garage Door Opener Remote Control 433mhz Clone Fixed Learning Code

How To Program Clicker Klik1u Universal 2 Button Garage Door Opener Remote Youtube

What Universal Remote Control Will Work With My Garage Door Opener Overhead Parts Online