Liftmaster Garage Door Opener Reset Code: Understanding and Troubleshooting
The Liftmaster garage door opener is a ubiquitous component of modern residential life, providing convenience and security. These devices utilize sophisticated rolling code technology to enhance security, preventing unauthorized access to the garage and home. Understanding how these codes work and the procedures for resetting them is crucial for both initial setup and troubleshooting common issues. This article provides a comprehensive explanation of Liftmaster garage door opener reset codes, covering their function, potential problems, and the steps required to reprogram them.
A garage door opener's primary function is to automate the opening and closing of the garage door. Liftmaster openers achieve this through a combination of mechanical components (motor, gears, track) and electronic controls. The remote control or a wall-mounted button transmits a signal to the opener, which then activates the motor. However, the key element in preventing unauthorized access is the use of a rolling code system. This system generates a new security code each time the remote control is used, preventing replay attacks where someone could record and reuse an old signal to gain entry. The opener and the remote need to be synchronized, so they both know the current code in the sequence.
The rolling code technology found in Liftmaster garage door openers relies on an algorithm that generates a unique code for each operation. When the remote control button is pressed, it transmits this new code to the garage door opener. The opener, having the same algorithm, anticipates the next code in the sequence and allows the door to operate. This system provides a significant layer of security compared to fixed-code systems used in older garage door openers. The process of pairing or programming the remote control to the opener involves aligning the remote’s rolling code sequence with the opener's. Sometimes, this synchronization can be lost, necessitating a reset and reprogramming.
Key Point 1: Understanding Rolling Code Technology
Rolling code technology is at the heart of Liftmaster garage door opener security. Unlike older systems that used a fixed code, rolling code systems generate a new code each time the remote is used. This prevents potential intruders from recording and replaying the code to gain unauthorized access. The algorithm used to generate these codes is known only to the manufacturer and is designed to be extremely difficult to crack. The remote control and the garage door opener are pre-programmed with the same algorithm, so they can communicate securely. The opener expects a certain range of codes and accepts the next valid one in the sequence.
The term "rolling code" implies a continuous sequence of codes. Each time the remote is activated, the code “rolls” to the next one in the sequence. The opener also advances its expected code to the next position. During the initial setup, the remote control and opener are synchronized, meaning they both know the starting point in the sequence. When a button on the remote is pressed, the remote transmits the next code in the sequence. The garage door opener verifies the code and, if valid, opens or closes the door. It then updates its expected code to the next one in the sequence. This ensures that even if someone intercepts a code, it cannot be reused.
The security benefits of rolling code technology are significant. Even if a potential intruder were to intercept a code, they would only have a limited window to use it before the code becomes invalid. Furthermore, the complexity of the algorithm makes it nearly impossible to predict the next code in the sequence. Rolling code systems are designed to prevent replay attacks, code grabbing, and other forms of electronic intrusion. Because of the security advantages, it’s become a standard feature in most modern garage door openers, including those from Liftmaster.
Key Point 2: Common Reasons for Resetting a Liftmaster Garage Door Opener
Several situations may necessitate resetting and reprogramming a Liftmaster garage door opener. One of the most common reasons is replacing the remote control. When a new remote is purchased, it needs to be paired with the garage door opener so it can transmit the correct rolling codes. The process involves putting the opener into learning mode and then pressing a button on the new remote to synchronize the code sequences.
Another common reason is a loss of synchronization between the remote control and the garage door opener. This can occur due to various factors, such as a power outage, a dead battery in the remote, or interference from other electronic devices. If the remote control suddenly stops operating the door, even after replacing the battery, it’s likely that the synchronization has been lost, requiring a reset and reprogramming.
Sometimes, the garage door opener's memory can become corrupted or full, preventing it from learning new remote codes. This can happen if multiple remotes have been programmed and subsequently lost or damaged. Resetting the opener's memory can clear out any old or corrupted codes and allow new remotes to be programmed successfully. This is especially useful when decommissioning old remotes that are no longer in use.
Furthermore, if the garage door opener is being installed in a new location or if the settings have been inadvertently changed, a reset might be necessary. The reset process generally involves clearing the existing codes and restoring the opener to its factory default settings. This provides a clean slate for programming new remotes and configuring the opener according to the specific needs of the new installation.
Key Point 3: Steps to Reset and Reprogram a Liftmaster Garage Door Opener
The process of resetting and reprogramming a Liftmaster garage door opener typically involves several steps. The exact procedure may vary slightly depending on the model of the opener, but the general principles remain the same. The first step is to locate the "Learn" button on the garage door opener unit. This button is usually located on the back or side of the motor housing and is often brightly colored.
Before proceeding, it's crucial to consult the user manual for the specific Liftmaster model. The manual provides detailed instructions and diagrams that can help you locate the "Learn" button and understand any specific requirements for your model. Safety precautions should always be followed when working with electrical equipment. Turn off the power to the garage door opener at the circuit breaker before attempting any reset or reprogramming procedures.
Once the "Learn" button has been located, press and release it. This puts the garage door opener into learning mode. The indicator light next to the button will usually illuminate, indicating that the opener is ready to learn a new code. Within 30 seconds of pressing the "Learn" button, press and hold the button on the remote control that you want to program. Continue holding the button until the garage door opener light flashes or you hear a clicking sound. This indicates that the opener has successfully learned the new code.
If you are programming multiple remote controls, repeat the process for each remote. Ensure that you press the "Learn" button on the opener before programming each remote. After programming all the remotes, test them to ensure that they are working correctly. If a remote does not work, repeat the programming process or consult the user manual for troubleshooting tips.
In some cases, it might be necessary to clear all the existing codes from the garage door opener's memory before programming new remotes. This can be done by pressing and holding the "Learn" button for a longer period, typically around six seconds. The indicator light will usually turn off, indicating that the memory has been cleared. After clearing the memory, you can then proceed with programming the new remotes as described above.
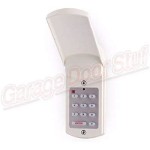
For wall-mounted control panels, the programming process might involve navigating through the menu options on the panel. Consult the user manual for specific instructions on how to program remote controls using the wall-mounted control panel. The manual will provide detailed steps on how to enter the programming mode and link the remote controls to the opener.
Troubleshooting common issues during the reset and reprogramming process is also essential. If the garage door opener does not enter learning mode, check the power supply and ensure that the "Learn" button is functioning correctly. If the remote control does not program successfully, try replacing the battery or moving closer to the garage door opener. Interference from other electronic devices can also prevent successful programming. Move away from any potential sources of interference, such as Wi-Fi routers or other wireless devices, during the programming process.
If the garage door opener still does not respond after resetting and reprogramming, it might be necessary to consult a qualified technician. There could be a more serious underlying issue with the opener that requires professional diagnosis and repair. Do not attempt to disassemble or repair the opener yourself, as this could be dangerous and void the warranty.
Regular maintenance can help prevent issues with the garage door opener and ensure that it continues to function properly. Check the batteries in the remote controls regularly and replace them as needed. Inspect the garage door tracks and rollers for any signs of wear or damage. Lubricate the moving parts of the garage door opener to keep them operating smoothly. By following these simple maintenance tips, you can extend the life of your Liftmaster garage door opener and avoid the need for frequent resets and reprogramming.
Understanding the security measures implemented in Liftmaster garage door openers, such as rolling code technology, allows the user to grasp the complexities involved in the reset and reprogramming processes. Knowing the common reasons for resetting the opener, from replacing remotes to resolving synchronization issues, helps homeowners proactively address potential problems. By following the outlined steps for resetting and reprogramming the opener, the user can regain control over their garage door operation and reinforce the security of their property.

How To Change Your Keypad Pin Code On A Liftmaster Garage Door

How To Program And Reset A Liftmaster Garage Door Keypad Step By Guide

How To Reset A Liftmaster Garage Door Opener Quickly

How To Reset A Liftmaster Garage Door Opener Quickly

How To Reset Liftmaster Garage Door Keypad Step By Instructions

How To Easily Reset Garage Door Keypad

How To Reset Garage Door Opener Liftmaster Updated 2024

How To Add Program Or Change A Liftmaster Keypad Pin Banko

Reset Liftmaster Garage Door Opener Keypad Updated 2024

How To Reset Your Garage Door Code In A Few Easy Steps