Understanding LiftMaster Garage Door Opener Buttons: Functionality and Troubleshooting
LiftMaster garage door openers are ubiquitous in both residential and commercial settings, providing convenient and secure access to garages. A fundamental aspect of their operation lies in the various buttons found on both the wall-mounted control panel and the remote controls. Understanding the function of these buttons, their potential issues, and basic troubleshooting can significantly improve the user experience and prolong the life of the opener.
The primary function of a garage door opener button, regardless of its location (wall control or remote), is to initiate the opening or closing sequence of the garage door. These buttons are typically designed with safety in mind and are often paired with safety sensors to prevent the door from closing on obstructions. LiftMaster openers incorporate a variety of button configurations and functionalities, evolving with technological advancements to provide enhanced security and convenience.
Key Button Functions on LiftMaster Garage Door Openers
Several key button functions are common across various LiftMaster garage door opener models. These functions provide the user with essential operational control, security features, and programming capabilities.
The Primary Open/Close Button: This is the most frequently used button and is generally the largest and most prominently displayed. Pressing this button once activates the garage door to open if it is closed, or to close if it is open. If the door is in motion, pressing the button will typically stop the door. A second press will then reverse the direction of the door. This functionality serves as a crucial safety feature.
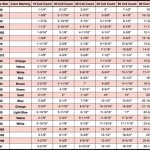
The Learn Button: This button, typically located on the back of the garage door opener motor unit, plays a crucial role in programming remote controls and keypads. When pressed, the learn button activates a short window of time, usually around 30 seconds, during which the opener is receptive to learning a new remote code. The user then presses the desired button on the remote control, sending a signal to the opener. The opener, recognizing the signal, stores the remote's code in its memory. This process allows the remote to communicate and control the garage door subsequently. The learn button is vital for adding new remotes, replacing lost or damaged ones, or clearing existing remote codes for security purposes. Different LiftMaster models utilize different colored learn buttons (e.g., yellow, red, orange, purple), which dictate the type of remote control that is compatible with the opener.
The Lock Button (Vacation Mode): This feature, often found on the wall-mounted control panel, provides an added layer of security by disabling the remote controls. When activated, the lock button prevents the garage door from being opened using the remote controls. The wall-mounted button inside the garage remains functional, allowing the homeowner to open and close the door manually. Vacation mode is particularly useful when the homeowner is away for an extended period, preventing unauthorized access through the remote controls. Deactivating the lock button restores the normal functionality of the remote controls.
The Light Button: Many LiftMaster garage door openers include a light feature that illuminates the garage when the door is opened or when the light button is pressed. The light button on the wall control allows manual control of the opener's light, enabling the user to turn it on or off independently of the door's movement. Some models also offer adjustable light timers, allowing the user to set how long the light remains on after activation.
Programming Buttons on Remote Controls: LiftMaster remote controls often feature multiple buttons that can be programmed to operate different garage doors or gate openers. The programming process typically involves pressing and holding a specific button on the remote until an indicator light illuminates or flashes. The user then presses the learn button on the garage door opener and follows the instructions specific to the model of remote and opener to establish the connection. These programmable buttons offer versatility, enabling a single remote to control multiple devices.
Common Problems and Troubleshooting
Despite their reliability, LiftMaster garage door opener buttons can sometimes experience issues, leading to frustrating operational problems. Understanding common problems and basic troubleshooting steps can help users resolve these issues effectively.
Remote Control Not Working: A common issue is a remote control that fails to operate the garage door. Several factors can contribute to this problem. First, the batteries in the remote control may be depleted and require replacement. Ensure that the new batteries are of the correct voltage and polarity. Second, the remote control may have become unpaired from the garage door opener. In this case, the remote needs to be reprogrammed using the learn button on the motor unit. The specific programming steps vary depending on the model, so consulting the owner's manual is essential. Third, interference from other electronic devices can disrupt the signal between the remote and the opener. Try moving away from potential sources of interference, such as fluorescent lights or other radio frequency devices, and test the remote again. Finally, if none of these steps work, the remote control itself may be faulty and needs to be replaced.
Wall Control Button Not Working: If the wall control button fails to operate the garage door, the problem may lie in the wiring connections between the wall control and the motor unit. Check the wires for any signs of damage, such as breaks or loose connections. Ensure that the wires are securely connected to both the wall control and the motor unit terminals. If the wiring appears to be intact, the wall control itself may be defective and require replacement. Additionally, ensure that the lock button (vacation mode) is not activated, as this disables the remote controls and may prevent the wall control from operating properly depending on the model.
Garage Door Opens But Won't Close: A situation where the garage door opens but refuses to close often points to a problem with the safety sensors. These sensors, located near the bottom of the door tracks, are designed to prevent the door from closing if an obstruction is detected. Ensure that the sensors are properly aligned and that there are no obstructions blocking the sensor beams. Clean the lenses of the sensors to remove any dirt or debris that may be interfering with their operation. If the sensors are misaligned, adjust them until the sensor lights are steadily illuminated. If the problem persists, the sensors themselves may be faulty and need to be replaced. Another less common cause could be the limit switch settings on the opener motor. These switches determine how far the door opens and closes. If these are incorrectly set, the door may not fully close. Consulting the manual for your opener is necessary to adjust these settings.
Garage Door Closes Partially and Reverses: This behavior often indicates an issue with the force settings on the garage door opener. The force settings determine the amount of force the opener applies when closing the door. If the force is set too high, the door may encounter resistance and reverse direction. If the force is set too low, the door may not close completely. Adjust the force settings according to the manufacturer's instructions. Consult the owner's manual for the specific adjustment procedure for your model. Additionally, ensure that the garage door tracks are properly lubricated and free from any obstructions that may be hindering the door's movement.
Maintaining and Protecting Your Garage Door Opener Buttons
Proper maintenance and protection can significantly extend the lifespan and reliability of your LiftMaster garage door opener buttons, both on the wall control and the remote controls.
Regular Battery Replacement: Remote controls rely on batteries for power. Regularly replace the batteries, typically annually or as needed, to ensure consistent performance. Use high-quality batteries of the correct voltage and polarity. Low battery power can lead to intermittent or unreliable operation.
Protecting Remotes from Damage: Remote controls are susceptible to damage from impacts, moisture, and extreme temperatures. Store remotes in a safe and dry place, away from direct sunlight and extreme temperatures. Consider using a protective case or cover to prevent damage from accidental drops. Avoid exposing the remotes to moisture, as this can corrode the internal components and render them inoperable.
Regular Cleaning: Dust and debris can accumulate on the buttons and surface of the wall control and remote controls, potentially affecting their functionality. Regularly clean the buttons with a soft, dry cloth to remove any dirt or debris. Avoid using harsh chemicals or abrasive cleaners, as these can damage the buttons and the surrounding surfaces. For stubborn dirt, dampen the cloth slightly with water, but ensure that no moisture enters the internal components.
Checking Wiring Connections: Periodically inspect the wiring connections between the wall control and the motor unit. Ensure that the wires are securely connected to the terminals and that there are no signs of damage or corrosion. Tighten any loose connections and replace any damaged wires. Proper wiring connections are essential for reliable operation of the wall control.
Understanding Safety Features: Familiarize yourself with the safety features of your LiftMaster garage door opener, including the safety sensors and the force settings. Regularly test these features to ensure that they are functioning correctly. If you encounter any problems, consult the owner's manual or contact a qualified garage door technician for assistance. Properly functioning safety features are crucial for preventing accidents and injuries.
By understanding the functions of the various buttons on LiftMaster garage door openers, recognizing potential issues, and implementing basic troubleshooting and maintenance procedures, users can ensure the reliable and safe operation of their garage door system.

Learn Button On A Liftmaster Garage Door Opener Doorvana Doors

Understanding The Liftmaster Learn Button Location

Universal Gate Garage Door Opener Remote Liftmaster

Where Is My Liftmaster Learn Button And What Does It Do

How To Program Travel On Liftmaster Security 2 0 Garage Door Opener

How To Program A Liftmaster Garage Door Opener Remote

3 Button Gate Remote Liftmaster

How To Program Liftmaster Remote Controls Doorvana Garage Doors

Garage Door Openers Learn Buttons Color Difference

Set Garage Door Travel Max Up And Down Liftmaster Myq