Liftmaster Garage Door Motor Replacement: A Comprehensive Guide
The reliable functioning of a garage door opener is integral to home security and daily convenience. When the motor, the powerhouse of the opener, begins to fail, replacing it becomes a necessity. Liftmaster is a leading brand in garage door opener technology, known for its durability and innovation. This article provides a detailed exposition on the process of Liftmaster garage door motor replacement, covering crucial aspects from identifying the need for replacement to executing the procedure safely and effectively.
Before embarking on any garage door repair, understanding the inherent risks is paramount. A garage door system is under significant spring tension and involves electrical components. Incorrect handling can lead to serious injury or property damage. It is strongly recommended that individuals without adequate experience and knowledge consult a qualified professional technician for assistance. This article serves as an informational guide and is not a substitute for professional expertise.
Identifying the Need for Liftmaster Motor Replacement
Recognizing the symptoms of a failing garage door motor is the first step in addressing the problem. Several indicators can suggest that a replacement is imminent. One common sign is unusual noises emanating from the opener unit. Grinding, clicking, or straining sounds during operation may point towards worn-out gears or a struggling motor. If the garage door operates sluggishly, hesitates during opening or closing, or stops intermittently, it is also a potential indication of motor weakening.
Another telltale symptom is the lack of response from the remote control or wall-mounted button. While battery issues or remote programming malfunctions can cause this problem, a faulty motor might be the underlying cause. Similarly, if the motor hums but the door fails to move, it signifies that the motor may be receiving power but unable to transfer that energy into mechanical movement. Furthermore, visual inspection of the motor unit might reveal physical damage such as burnt wires, cracked housings, or oil leaks, confirming the necessity of replacement.
Older Liftmaster models, even those meticulously maintained, may simply reach the end of their lifespan. Motors have moving parts that degrade over time with usage, leading to diminished performance. The frequency of garage door operation, the weight of the door, and environmental factors all contribute to the motor's wear and tear. If the motor has been in service for an extended period (typically exceeding 10-15 years), it's prudent to consider replacement even if it is still functioning, to prevent potential future breakdowns and ensure continued reliability.
Preparing for the Replacement Process
Replacing a garage door motor requires careful preparation to ensure safety and efficiency. First, disconnect the garage door opener from the power source. This is a critical step to prevent electrical shock during the replacement process. Locate the power cord plugged into an outlet and unplug it securely. If the opener is hardwired, turn off the circuit breaker that controls the garage door opener. Verify that the power is indeed off by attempting to operate the opener via the wall button or remote control.
Gather the necessary tools and materials. These include a new Liftmaster garage door motor compatible with the existing opener model, a socket set, wrenches, screwdrivers (both flathead and Phillips head), pliers, wire strippers, wire connectors, a multimeter (for electrical testing), a ladder, and safety glasses. Having all these items readily available will streamline the replacement procedure and minimize interruptions.
Before removing the old motor, carefully examine the existing wiring and connections. Take detailed photographs or create a diagram of the wiring configuration. This visual reference will prove invaluable when connecting the new motor, ensuring proper polarity and functionality. Labeling wires with tape can also aid in accurate reconnection. Additionally, ensure that the new Liftmaster motor comes with all the necessary mounting hardware and instructions. If the instructions are not clear or inadequate, consult the Liftmaster website or technical support for clarification.
Executing the Motor Replacement
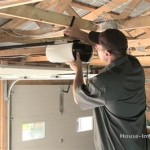
With the power disconnected and the tools prepared, the replacement process can commence. First, detach the garage door from the opener carriage. This is typically achieved by pulling the emergency release cord, a red handle hanging from the opener rail. Manually lift the garage door a few feet off the ground and secure it in a stable position using clamps or locking pliers on the track. This step is crucial to prevent the door from falling unexpectedly during the motor replacement.
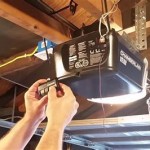
Next, carefully disconnect the wiring from the old motor. Refer to the photographs or wiring diagram created earlier to ensure precise disconnection. Use wire strippers to carefully expose the bare ends of the wires and disconnect them from the motor terminals. Once the wiring is disconnected, unbolt the old motor from the garage door opener unit. This usually involves removing several bolts that secure the motor to the mounting bracket. Be prepared to support the weight of the motor as the final bolt is removed, as it can be heavy.
Install the new Liftmaster motor by reversing the removal process. Position the new motor onto the mounting bracket and secure it with the bolts that were removed from the old motor. Ensure that the motor is firmly attached and properly aligned. Reconnect the wiring to the new motor, meticulously matching the wiring diagram or photographs taken earlier. Use wire connectors to securely join the wires, ensuring proper insulation and preventing shorts. Double-check all wiring connections to prevent errors.
Once the new motor is installed and the wiring is connected, reattach the garage door to the opener carriage. Re-engage the emergency release mechanism to reconnect the door and opener. Carefully test the operation of the garage door by pressing the wall-mounted button or using the remote control. Observe the door's movement to ensure it opens and closes smoothly and evenly. If the door exhibits any unusual behavior, such as jerky movement or excessive noise, immediately stop the operation and re-examine the installation.
After the initial testing, perform several test cycles to ensure the door operates reliably. Check the limit settings of the opener, which determine how far the door opens and closes. Adjust these settings as necessary, following the instructions provided with the new Liftmaster motor. Also, test the safety features of the opener, such as the safety sensors. These sensors are designed to prevent the door from closing if an obstruction is detected in its path. Place an object, such as a piece of wood, in the door's path and attempt to close the door. The door should stop and reverse direction upon detecting the obstruction. If the safety sensors are not functioning correctly, adjust their alignment or consult the Liftmaster manual for troubleshooting guidance.
Finally, inspect the entire garage door system thoroughly. Ensure that all components are properly aligned, securely fastened, and functioning as intended. Tighten any loose bolts or screws. Lubricate moving parts, such as rollers and hinges, with a silicone-based lubricant to ensure smooth operation and reduce wear and tear. Dispose of the old motor and any used materials responsibly, following local regulations for electronic waste disposal.
Following these steps diligently will facilitate a successful Liftmaster garage door motor replacement. However, remember to prioritize safety and seek professional assistance when needed. Garage door systems involve inherent risks, and proper expertise ensures a safe and reliable installation.

041d3058 Motor And Bracket Kit Parts Liftmaster

041 0236 000 Motor With Travel Module Dc Parts Liftmaster

041a7442 Motor With Travel Module Belt Drive Liftmaster

041d5563 Motor 3 4hp Parts Liftmaster

Liftmaster 041d4509 Replacement Motor Kit Ats211 Series Garage Door Openers

Garage Door Gear Replacement On Liftmaster Craftsman Openers Broken And Sprocket

Liftmaster 041d0843 Replacement Motor And Sensor 12vdc Garage Door Openers

Diy Repair Chamberlain Liftmaster 2265 Garage Door Opener Bench Reviews

Liftmaster 81650 Unboxing Garage Door Opener Replacement Productreview

How To Change The Gear And Sprocket In A Garage Door Opener Liftmaster Chamberlain Youtube
See Also