Liftmaster Garage Door Light Won't Turn Off: Troubleshooting Guide
An illuminated garage door opener, particularly one that persists even after the door is closed, can be a source of frustration and concern. Liftmaster garage door openers, while generally reliable, are not immune to malfunctions that can cause the light to remain on. Understanding the potential causes and applicable troubleshooting steps is crucial for resolving this issue effectively.
This article provides a comprehensive guide to diagnosing and addressing the problem of a Liftmaster garage door opener light that will not switch off. It delves into the various components involved, the common reasons for this malfunction, and the systematic procedures for identifying and rectifying the underlying cause. The information presented is intended for individuals with a basic understanding of electrical systems and garage door opener mechanics. If uncertainty exists at any point in the troubleshooting process, consulting a qualified technician is strongly recommended.
Possible Causes and Initial Checks
Several factors can contribute to a Liftmaster garage door opener light staying on. A systematic approach, starting with the most straightforward possibilities, is the most efficient way to identify the source of the problem.
Motion Detection Settings: Some Liftmaster models include a motion detection feature that automatically turns on the light when movement is sensed within the garage. This feature is designed for convenience and security, but if the sensitivity is set too high, or if there are constant sources of motion (e.g., a pet moving within the sensor range, shadows cast by moving trees), the light may remain on indefinitely.
Timer Functionality: Certain Liftmaster openers have a timer setting that keeps the light on for a predetermined period after the door is activated. If this timer has been inadvertently activated or set to an extended duration, it can create the impression that the light is malfunctioning.
Light Socket and Bulb Compatibility: The type of bulb used in the garage door opener can significantly impact its performance. Incandescent bulbs are generally compatible, but LED or CFL bulbs may cause issues if they are not specifically designed for garage door openers. Some LED bulbs, while energy-efficient, can interfere with the opener's internal circuitry, leading to malfunctions, including the light staying on.
Wiring Issues: Damaged or loose wiring within the garage door opener unit or connecting to the light socket can cause electrical shorts, resulting in the light remaining illuminated. Rodent damage is a common cause of wiring problems in garages.
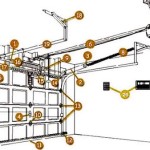
Limit Switch Malfunction: Limit switches are responsible for signaling to the opener when the door has reached its fully open or fully closed position. If a limit switch malfunctions or becomes misaligned, the opener may not register that the door is closed, causing the light to stay on.
Logic Board Failure: The logic board is the central control unit of the garage door opener. If the logic board fails, it can lead to various malfunctions, including the light not turning off. This is often the most complex and expensive issue to resolve.
Initial Checks and Troubleshooting Steps: Begin by inspecting the light bulb. Ensure it is the correct type recommended by Liftmaster and that it is securely screwed into the socket. Next, examine the motion detection settings. Consult the owner's manual for instructions on adjusting or disabling this feature. Check the timer settings, if applicable, and ensure they are set to the desired duration or disabled altogether. Finally, visually inspect the wiring for any signs of damage or loose connections.
Examining the Light Socket and Bulb Compatibility
The light socket and the type of light bulb used are crucial components in the garage door opener's lighting system. Incompatibility or damage to these components can lead to the persistent illumination issue.
Socket Inspection: Start by disconnecting the garage door opener from its power source to ensure safety. Carefully inspect the light socket for any signs of damage, such as corrosion, broken contacts, or loose connections. Use a flashlight to get a clear view of the socket's interior. If corrosion is present, gently clean the contacts with a wire brush or fine-grit sandpaper. Ensure the central contact is properly positioned to make firm contact with the bulb. If the socket is significantly damaged, replacement may be necessary.
Bulb Compatibility: As mentioned earlier, LED and CFL bulbs can sometimes cause compatibility issues with Liftmaster garage door openers. While many newer LED bulbs are designed to be compatible, older models or those not specifically labeled for garage door opener use may interfere with the opener's circuitry. Try replacing the LED or CFL bulb with a standard incandescent bulb to see if the problem resolves. If an incandescent bulb works correctly, then the original bulb was likely the issue. When selecting LED bulbs, look for those that are specifically marketed as garage door opener compatible and that have built-in surge protection to withstand the voltage fluctuations that can occur during opener operation.
Wattage Limitation: Ensure that the light bulb wattage does not exceed the maximum wattage specified by Liftmaster for the garage door opener. Using a bulb with a higher wattage than recommended can overload the circuit and potentially damage the opener's internal components, including the logic board. Refer to the owner's manual or the label on the opener for the maximum allowable wattage.
Bulb Installation: Ensure the light bulb is properly installed and securely screwed into the socket. A loose bulb can cause intermittent contact, which may contribute to the light staying on or flickering. Gently tighten the bulb, but avoid over-tightening, as this can damage the socket.
Troubleshooting Wiring and Limit Switch Issues
Electrical wiring and limit switches play a critical role in the proper functioning of the garage door opener, and problems with these components can prevent the light from turning off.
Wiring Inspection: Begin by disconnecting the garage door opener from its power source. Carefully inspect all visible wiring connected to the light socket and within the opener unit. Look for any signs of damage, such as frayed insulation, exposed wires, or rodent damage. Pay particular attention to the wires connecting to the light socket, as these are often subjected to movement and vibration, which can lead to wear and tear. If damaged wiring is found, it should be repaired or replaced by a qualified electrician. Ensure that all wire connections are secure and properly insulated. Use wire connectors or electrical tape to insulate any exposed wires.
Limit Switch Examination: Limit switches are typically located on the garage door opener rail, near the motor unit. They are responsible for signaling to the opener when the door reaches its full open or full closed position. If a limit switch is malfunctioning or misaligned, the opener may not register that the door is fully closed, causing the light to stay on. Locate the limit switches and visually inspect them for any physical damage or misalignment. The switches should move freely and make contact with the door when it reaches its designated position. If a limit switch is damaged, it should be replaced. If a limit switch is misaligned, it can be adjusted by loosening the mounting screws and repositioning the switch until it makes proper contact with the door. Refer to the owner's manual for specific instructions on limit switch adjustment for your Liftmaster model.
Testing Limit Switch Functionality (Advanced): Using a multimeter, it is possible to test the functionality of the limit switches. With the garage door opener disconnected from power, set the multimeter to the continuity setting. Place the multimeter probes on the terminals of the limit switch. When the switch is activated (i.e., when the door presses against it), the multimeter should indicate continuity. If the multimeter does not indicate continuity when the switch is activated, the switch is likely faulty and needs to be replaced. This test requires some electrical knowledge and should only be performed by individuals comfortable working with electrical circuits.
Checking for Short Circuits: A short circuit can occur when a bare wire comes into contact with another wire or a grounded metal surface. This can cause the light to stay on or other electrical malfunctions. Use a multimeter to check for short circuits. Disconnect the garage door opener from its power source. Set the multimeter to the continuity setting. Place one probe on a wire terminal and the other probe on a grounded metal surface. If the multimeter indicates continuity, there is a short circuit. Identify the location of the short circuit and repair the wiring accordingly.
It is imperative to exercise caution when working with electrical wiring. If any uncertainty exists regarding the safety or proper procedures, consult a qualified electrician.
If these troubleshooting steps do not resolve the issue and the light continues to remain on, the problem may lie within the logic board of the garage door opener. Replacing the logic board is a more complex repair and may be best left to a qualified technician. It is also prudent to consider the age of the opener. A significantly older unit may be nearing the end of its lifespan, and the cost of repairs may outweigh the benefits compared to replacing the entire unit with a newer, more efficient model. A new opener can also offer enhanced security features and smart home integration capabilities.

Reasons Why You Re Garage Door Light Isn T Working How To Fix It

Chamberlain Lift Master Garage Door Opener Lights Stay On And Nothing Works This Could Be Why Youtube

Garage Door Opener Lights Won T Turn Off Youtube

Genie Garage Door Lights Won T Turn Off Try This Youtube

Liftmaster Garage Will Not Open Red Yellow Led Blink And Beep Ifixit Repair Guide

Garage Opener Light Blinking A Troubleshooting Guide

Why Are My Garage Door Opener Lights Staying On Banko

Why Are My Garage Door Opener Lights Staying On Banko

Why My Liftmaster Garage Door Light Blinking Continuously

Liftmaster Garage Door Openers Troubleshooting Hints