Installing Garage Door Track Yourself: A Comprehensive Guide
Garage door tracks are crucial components of a functional and safe garage door system. They guide the rollers, allowing the door to move smoothly up and down. Damage, misalignment, or wear and tear can compromise the operation of the door, potentially leading to safety hazards and costly repairs. While professional installation is always an option, installing garage door track yourself can be a viable project for homeowners with moderate DIY skills and a good understanding of mechanical systems. This guide provides a detailed, step-by-step approach to installing garage door track, ensuring a safe and efficient outcome.
Before embarking on this project, it's essential to assess one's capabilities and the complexity of the installation. Replacing existing tracks in the same configuration is significantly simpler than installing a completely new garage door system or dealing with significant structural issues. If there are any doubts about your ability to handle the project safely and correctly, consulting with a professional garage door technician is strongly advised.
Safety is paramount throughout the entire process. Working with heavy components and potentially high-tension springs requires careful attention to detail and a commitment to following safety guidelines. Always disconnect the garage door opener from the power source before beginning any work on the door or track system. Wearing safety glasses, work gloves, and sturdy footwear is crucial to protect against injuries.
Key Point 1: Preparing for the Installation
Proper preparation is fundamental to a successful garage door track installation. This involves gathering the necessary tools and materials, carefully inspecting the existing setup (if applicable), and taking accurate measurements.
Tools and Materials:
The following is a comprehensive list of tools and materials needed for installing garage door track:
- New garage door track (matching the specifications of your door)
- Level (at least 4-foot length)
- Tape measure
- Wrench set (various sizes)
- Socket set (various sizes)
- Adjustable wrench
- Pliers
- Screwdrivers (both flathead and Phillips head)
- Hammer
- Drill with various drill bits
- Safety glasses
- Work gloves
- Stud finder
- Lag screws or bolts (appropriate size and length for your application)
- Wood shims (if necessary)
- C-clamps
- Ladder
- Helper (highly recommended, especially for lifting heavier sections of track)
Inspecting the Existing Setup:
If replacing existing tracks, carefully examine the old tracks for signs of damage, wear, or misalignment. Note how the track sections are connected, the placement of brackets, and the overall alignment of the system. Taking photos or videos of the existing setup can be helpful as a reference during the installation process. Pay attention to the type of rollers being used, as the track must be compatible with the rollers. If the rollers are worn or damaged, consider replacing them along with the track.
Taking Accurate Measurements:
Accurate measurements are crucial for ensuring that the new tracks are installed correctly. Measure the height and width of the garage door opening, as well as the distance from the top of the opening to the ceiling. This information will help determine the length of the vertical and horizontal track sections. Measure the distance between the wall studs to ensure proper bracket placement. When purchasing new track, ensure that it matches the dimensions of the existing track or the specifications of your garage door.
Preparing the Workspace:
Clear the area around the garage door opening to provide ample space for working. Remove any obstacles that may interfere with the installation process. If the garage door is still operational, raise it to its fully open position and secure it in place using C-clamps or locking pliers on the track below the bottom rollers. This will prevent the door from accidentally closing during the installation.
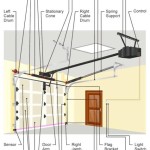
Key Point 2: Installing the Vertical Track Sections
The vertical track sections are the foundation of the garage door track system. They must be installed plumb (perfectly vertical) and securely attached to the wall studs to ensure smooth and safe operation of the door.
Locating the Wall Studs:
Use a stud finder to locate the wall studs on either side of the garage door opening. Mark the location of the studs with a pencil. The vertical track sections will be attached to these studs using lag screws or bolts.
Attaching the Mounting Brackets:
Attach the mounting brackets to the vertical track sections. The brackets are typically pre-drilled with holes for attaching them to the track and the wall studs. Use bolts and nuts to securely fasten the brackets to the track. Ensure that the brackets are properly aligned and spaced according to the manufacturer's instructions.
Positioning the Vertical Track Sections:
With the brackets attached, carefully position the vertical track sections against the wall studs. Use a level to ensure that the track is plumb. If the wall is not perfectly flat, use wood shims to create a level surface behind the track. Hold the track in place with C-clamps while you attach it to the wall studs.
Securing the Track to the Wall Studs:
Drill pilot holes through the mounting brackets and into the wall studs. Use lag screws or bolts to securely fasten the track to the studs. Ensure that the screws or bolts are long enough to penetrate deeply into the studs for maximum holding power. Tighten the screws or bolts with a wrench, but avoid over-tightening, which could damage the studs or the track. Recheck the plumb of the track after tightening the fasteners.
Adjusting the Track Alignment:
After attaching the vertical track sections, check the alignment of the track. The track should be parallel to the garage door opening and evenly spaced from the wall on both sides. If necessary, loosen the mounting brackets and adjust the position of the track until it is properly aligned. Re-tighten the brackets after making adjustments.
Key Point 3: Installing the Horizontal Track Sections
The horizontal track sections guide the garage door as it curves from the vertical to the horizontal position. Proper installation of these sections is critical for smooth and reliable operation of the door.
Attaching the Horizontal Track Sections to the Vertical Sections:
Carefully align the horizontal track sections with the vertical track sections. The horizontal sections typically connect to the vertical sections with bolts or screws. Ensure that the connection is secure and that the track is properly aligned. Use a level to ensure that the horizontal track is level.
Supporting the Horizontal Track Sections:
The horizontal track sections must be properly supported to prevent them from sagging or bending. This is typically accomplished using hanging brackets that are attached to the ceiling joists or rafters. Locate the ceiling joists or rafters and mark their location with a pencil. Attach the hanging brackets to the ceiling using lag screws or bolts. Ensure that the brackets are securely attached and that they can support the weight of the track and the door.
Connecting the Hanging Brackets to the Horizontal Track:
Attach the hanging brackets to the horizontal track sections. The brackets are typically adjustable, allowing you to fine-tune the height and alignment of the track. Use bolts and nuts to securely fasten the brackets to the track. Ensure that the track is level and that it is properly aligned with the vertical track sections.
Checking the Track Alignment and Smoothness of Operation:
After installing the horizontal track sections, carefully check the alignment of the entire track system. The track should be smooth and continuous, with no sharp bends or misalignments. Manually move the garage door along the track to ensure that it moves freely and smoothly. If there are any areas where the door binds or catches, adjust the track alignment until the door moves smoothly throughout its entire range of motion. Ensure the rollers move freely within the track along the whole length and at the curve points.
Installing Additional Support Braces:
For added stability, especially for heavier garage doors, consider installing additional support braces between the horizontal track and the ceiling. These braces can help to prevent sagging and ensure that the track remains properly aligned. Attach the braces to the track and the ceiling using lag screws or bolts.
After completing the installation, double-check all connections and fasteners to ensure that they are tight and secure. Reconnect the garage door opener to the power source and test the operation of the door. Observe the door carefully as it opens and closes, looking for any signs of binding, misalignment, or instability.
If any issues are detected, immediately disconnect the garage door opener and investigate the cause of the problem. Make any necessary adjustments to the track alignment or support brackets until the door operates smoothly and safely. It is crucial to prioritize safety at every stage of the installation process.
Finally, perform regular maintenance on the garage door track system to ensure its continued smooth and reliable operation. Lubricate the rollers and hinges periodically, and inspect the track for any signs of damage or wear. Promptly address any issues that are detected to prevent them from escalating into more serious problems.

How To Install A Garage Door Step By Instructions Howstuffworks

How To Install An Overhead Garage Door With S Wikihow

How To Install A Garage Door Step By Instructions Howstuffworks

How To Measure For A New Garage Door One Clear Choice

How To Install A Garage Door

How To Replace A Garage Door With S Wikihow

Garage Door Spring Replacement Repairing Springs Diy

How To Install A Garage Door Opener Expert Tips

How To Install A Garage Door By Yourself Youramazingplaces Com

Install An Insulated Garage Door San Diego Union Tribune
See Also