How To Reprogram Garage Door Opener Remote
If your garage door opener remote has stopped working, you can reprogram it yourself in a few simple steps. Here's how to do it:
1. Gather Your Materials
You will need the following materials:
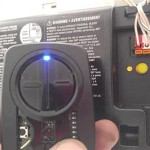
*2. Find the Learn Button
The learn button is usually located on the back of the garage door opener motor unit. It is a small button that is typically red or yellow. If you can't find the learn button, consult your garage door opener's manual.
3. Press the Learn Button
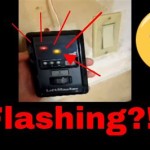
Once you have found the learn button, press and hold it for a few seconds. The LED light on the motor unit will start to flash.
4. Press the Button on the New Remote
While the LED light is flashing, press and hold the button on the new remote. The LED light will stop flashing and stay solid, indicating that the remote has been programmed.
5. Test the Remote
Once the remote has been programmed, test it by pressing the button. The garage door should open or close.
6. Reprogram Additional Remotes
If you have additional remotes that you want to reprogram, repeat steps 3-5 for each remote.
Troubleshooting
If you are having trouble reprogramming your garage door opener remote, here are a few troubleshooting tips:
*
How To Program A Garage Door Remote Change Battery Liftmaster Chamberlain

How To Program A Remote For Chamberlain Liftmaster Craftsman Garage Door Opener Setup Process

How To Program A Universal Garage Door Opener Remote Control

How To Program A Universal Garage Door Opener Remote Youtube

3 Easy Ways To Program A Garage Door Opener Wikihow

How To Fix Garage Door Opener Remote Champion Repair

Add Or Reprogram A Garage Door Remote

Garage Door Remote Not Working 5 Most Common Reasons Why

How To Program A Garage Door Opener Remote All Brands

Programming A Chamberlain Garage Door Opener Easy Steps
See Also