How to Fix a Liftmaster Garage Door Remote
A Liftmaster garage door opener provides convenience and security. However, a malfunctioning remote can disrupt daily routines. Diagnosing and resolving remote issues can often be accomplished without professional assistance. This article provides a comprehensive guide to troubleshooting and fixing common problems with Liftmaster garage door remotes.
Before initiating any troubleshooting steps, ensure the garage door opener itself is functioning correctly. Manually operate the door using the wall-mounted control to verify that the motor and track system are operating properly. If the wall control is also malfunctioning, the issue likely resides with the opener unit and not the remote. Check the power supply to the opener, the motor, and any wiring connections. If the opener itself is not functioning, consult a qualified technician.
Once the opener is confirmed to be working, focus on diagnosing the remote. The most common issues stem from battery problems, frequency interference, programming errors, and physical damage. Each of these potential problems requires a different approach to resolve.
Replacing the Remote Battery
The most common cause of a non-functioning garage door remote is a depleted battery. The remote relies on the battery to transmit the signal to the garage door opener. As the battery's voltage decreases, the signal weakens, and the remote's range diminishes. Eventually, the signal becomes too weak for the opener to recognize.
To replace the battery, locate the battery compartment on the remote. This is usually located on the back of the remote or under a sliding cover. The exact location and method of opening the compartment vary depending on the remote model. Refer to the remote's user manual for specific instructions on battery replacement.
Carefully open the battery compartment, taking note of the battery's orientation. Most Liftmaster remotes use button cell batteries, such as CR2032. Note the positive (+) and negative (-) terminals. Remove the old battery and dispose of it properly according to local regulations. Insert the new battery, ensuring it matches the polarity of the old battery. Close the battery compartment securely.
After replacing the battery, test the remote by pressing the button. If the garage door opens or closes, the battery replacement has resolved the issue. If the remote still does not function, proceed with further troubleshooting steps.
Consider the battery's expiration date when purchasing a replacement. Using a fresh battery from a reputable brand extends the remote's life and reliability. Low-quality batteries may have a shorter lifespan or deliver inconsistent voltage, leading to remote malfunctions.
Addressing Frequency Interference
Radio frequency (RF) interference can disrupt the signal between the remote and the garage door opener. Other electronic devices, such as wireless routers, cordless phones, and baby monitors, can operate on similar frequencies, causing interference. Metal objects between the remote and the opener can also block the signal.
To resolve frequency interference, try the following steps: Temporarily disable or relocate any nearby electronic devices that could be causing interference. Test the remote's range by moving closer to the garage door opener. If the remote works at close range but not from a distance, interference is likely the cause.
Certain types of lighting, particularly LED bulbs, can also emit RF interference. Try replacing any nearby LED bulbs with incandescent or halogen bulbs to see if this resolves the issue. Consider the placement of the garage door opener antenna. Ensure it is extended and free from obstructions. Repositioning the antenna can improve signal reception.
Liftmaster garage door openers utilize different frequencies, including 315 MHz and 390 MHz. Remotes and openers must use the same frequency to communicate. Some newer models employ rolling code technology, which changes the code each time the remote is used, enhancing security and reducing the risk of code theft. Older models may use a fixed code system, which is more susceptible to interference and security breaches.
If frequency interference continues to be a problem, consider installing a signal repeater. A signal repeater amplifies the signal from the remote, extending its range and overcoming interference. Position the repeater in a location where it can receive the signal from the remote and transmit it to the garage door opener effectively.
Reprogramming the Remote
Sometimes, the remote loses its programming and needs to be reprogrammed to communicate with the garage door opener. This can happen if the remote's memory is corrupted or if the opener's settings have been changed.
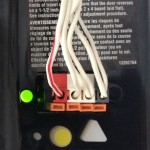
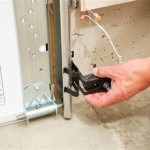
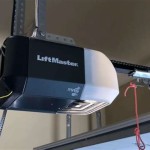
To reprogram the remote, locate the "Learn" button on the garage door opener motor unit. The location of the Learn button varies depending on the model, but it is usually located on the back or side of the motor unit. It is often a colored button, such as yellow, red, orange, or purple. Refer to the opener's user manual for the exact location of the Learn button. Press and release the Learn button.
Within 30 seconds of pressing the Learn button, press and hold the button on the remote that you want to program. Hold the button until the garage door opener light flashes or you hear a clicking sound. This indicates that the remote has been successfully programmed.
If the opener has a Smart Control Panel, the programming process might be different. Consult the control panel's documentation for instructions on programming remotes through the control panel menu. Some newer models require you to enter a PIN code before programming a new remote.
After programming the remote, test it by pressing the button. If the garage door opens or closes, the reprogramming has been successful. If the remote still does not function, repeat the programming process. Sometimes, it may take several attempts to successfully program the remote.
If you have multiple remotes to program, repeat the programming process for each remote. Ensure that each remote is programmed to the same garage door opener unit.
In case the Learn button doesn't work after multiple attempts, consider resetting the garage door opener. The reset procedure varies between models, but typically involves holding down the Learn button for a certain duration, often 6-10 seconds, until the programming light clears or turns off, indicating that all previous programming has been erased. After resetting, attempt to reprogram the remotes following the steps outlined earlier.
Inspecting for Physical Damage
Physical damage to the remote can prevent it from functioning properly. Common types of damage include cracked cases, broken buttons, and water damage.
Visually inspect the remote for any signs of damage. Check for cracks in the case, broken buttons, or loose components. If the remote has been exposed to water, open the battery compartment and check for corrosion. Water damage can short-circuit the internal components of the remote.
If the remote is damaged but still under warranty, contact Liftmaster or the retailer where you purchased the remote to inquire about a replacement. If the remote is not under warranty, you may be able to repair it yourself or purchase a new remote.
For minor damage, such as a cracked case, consider using epoxy or super glue to repair the damage. Be careful not to get glue on any of the internal components. If a button is broken, you may be able to purchase a replacement button online or from a hardware store. Solder the new button onto the circuit board, taking care to match the polarity of the old button.
If the remote is heavily damaged or water-damaged, it may be more cost-effective to replace it than to repair it. Liftmaster remotes are readily available online and from home improvement stores. Ensure that you purchase a remote that is compatible with your garage door opener model.
To prevent physical damage, store the remote in a safe place, such as your car's glove compartment or on a keychain. Avoid dropping the remote or exposing it to extreme temperatures or moisture.
In summary, fixing a Liftmaster garage door remote involves systematically troubleshooting potential issues. Start with the simplest solutions, such as replacing the battery, and then proceed to more complex steps, such as addressing frequency interference and reprogramming the remote. Physical damage should also be checked. Following these steps can often resolve common remote problems and restore functionality.

Garage Door Remote Not Working 5 Most Common Reasons Why Youtube

How To Change The Battery On Garage Door Remote Liftmaster Security Chamberlain Opener

How To Fix Garage Door Opener Remote Champion Repair

How To Reset A Liftmaster Garage Door Opener Quickly

How To Replace Garage Door Opener Remote Battery Change Replacement Liftmaster Clicker Batteries

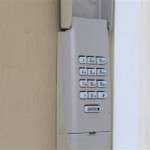
How To Reset Remote Keypad Access Pin On Chamberlain Liftmaster Craftsman Garage Door Opener Delete

Liftmaster Garage Door Opener Remote Battery Diy Tips 2024

Common Liftmaster Garage Door Remote Issues And How To Fix Them

How To Change Liftmaster Garage Code A Step By Guide

How To Reset A Liftmaster Garage Door Opener Quickly
See Also