Here's an article on how to coat a garage floor, focusing on clarity, information, and a professional tone:
How To Coat Your Garage Floor: A Comprehensive Guide
Coating a garage floor is a popular home improvement project that offers numerous benefits. A professionally coated floor enhances the aesthetics of the garage, provides a durable and easy-to-clean surface, and protects the concrete from damage caused by oil, chemicals, and wear and tear. This article provides a comprehensive guide to the process, outlining the necessary steps and considerations for achieving a long-lasting and visually appealing result.
Before commencing any work, it is crucial to plan and prepare the garage space adequately. This involves assessing the condition of the existing concrete floor, selecting the appropriate coating system, gathering the required tools and materials, and ensuring a safe and well-ventilated work environment. Neglecting these preparatory steps can compromise the quality and longevity of the finished coating.
Key Point 1: Preparation is Paramount
The success of any garage floor coating project hinges heavily on proper preparation. This phase involves thoroughly cleaning and repairing the concrete surface, addressing any existing cracks or damage, and ensuring optimal adhesion of the coating system. Skimping on preparation will inevitably lead to coating failure, peeling, or other issues later on.
The first step is to remove all items from the garage. This includes vehicles, tools, storage containers, and any other objects that might obstruct access to the floor. A clean and uncluttered workspace is essential for efficient and effective preparation.
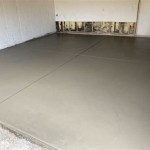
Next, thoroughly clean the concrete floor. Start by sweeping or vacuuming to remove loose dirt, dust, and debris. For stubborn stains or oil spots, use a degreaser specifically designed for concrete. Follow the manufacturer's instructions for application and dwell time. After applying the degreaser, scrub the floor with a stiff-bristled brush or a floor scrubber. Rinse the floor thoroughly with clean water and allow it to dry completely. This process can be repeated if needed.
After cleaning, inspect the floor for cracks, holes, or other imperfections. Small cracks can be filled with a concrete crack filler or patching compound. Larger cracks may require more extensive repairs, such as using a concrete repair mortar. Follow the manufacturer's instructions for application and curing. Ensure the repair material is compatible with the chosen coating system.
Once the repairs are complete, the concrete surface must be properly profiled to ensure optimal adhesion of the coating. This is typically achieved through acid etching or mechanical grinding. Acid etching involves applying a diluted solution of muriatic acid to the concrete surface, which opens the pores and creates a rough texture. Follow the manufacturer's instructions for the acid-to-water ratio and dwell time. Wear appropriate protective gear, including gloves, eye protection, and a respirator, during this process. After etching, thoroughly rinse the floor with clean water and neutralize any remaining acid with a solution of baking soda and water. Allow the floor to dry completely.
Alternatively, mechanical grinding uses a concrete grinder equipped with diamond grinding pads to remove a thin layer of the surface and create a profile. This method is generally preferred for larger projects or when dealing with heavily contaminated concrete. It is also less hazardous than acid etching. Wear appropriate dust protection during grinding.
Key Point 2: Selecting the Right Coating System
Choosing the appropriate coating system is crucial for achieving the desired durability, appearance, and resistance to specific environmental factors. Several types of garage floor coatings are available, each with its own advantages and disadvantages. The most common options include epoxy, polyurethane, and acrylic coatings.
Epoxy coatings are known for their excellent adhesion, durability, and chemical resistance. They are a popular choice for garage floors due to their ability to withstand heavy traffic, spills, and impacts. Epoxy coatings typically consist of two components: a resin and a hardener, which are mixed together before application. They are available in a variety of colors and finishes, including solid colors, metallic finishes, and decorative flake systems.
Polyurethane coatings offer superior flexibility and UV resistance compared to epoxy coatings. They are less likely to crack or chip under stress and are better suited for areas exposed to direct sunlight. Polyurethane coatings are often used as a topcoat over epoxy to enhance durability and provide a glossy finish. They also offer excellent abrasion resistance.
Acrylic coatings are typically less expensive than epoxy or polyurethane coatings. They are easier to apply and dry quickly, making them a suitable option for DIY projects. However, acrylic coatings are less durable and chemical resistant than epoxy or polyurethane. They are best suited for light-duty applications where aesthetics are more important than performance.
Consider the specific needs of your garage when selecting a coating system. If you plan to park vehicles in the garage, choose a coating that can withstand heavy traffic and resist oil and chemical spills. If the garage is exposed to direct sunlight, opt for a UV-resistant coating. If you desire a decorative finish, consider using a flake system or a metallic epoxy coating.
In addition to the type of coating, consider the solids content of the product. Coatings with higher solids content tend to be more durable and provide better coverage. Low-solids coatings may require multiple coats to achieve the desired thickness and protection.
Key Point 3: Application Techniques and Best Practices
Proper application techniques are essential for achieving a smooth, even, and long-lasting garage floor coating. This involves using the correct tools, following the manufacturer's instructions carefully, and paying attention to detail throughout the process.
Before mixing the coating, gather all the necessary tools and materials, including a mixing bucket, a drill with a mixing paddle, a roller frame, roller covers, a brush, a squeegee (optional), and spiked shoes (optional). Ensure the tools are clean and in good condition.
Mix the coating according to the manufacturer's instructions. Use a drill with a mixing paddle to thoroughly combine the resin and hardener. Pay attention to the mixing time and pot life specified by the manufacturer. Pot life refers to the amount of time the mixed coating remains usable before it begins to harden.
Begin applying the coating along the perimeter of the garage floor using a brush. Cut in around the edges, corners, and any obstacles. This will create a clean and uniform edge for the roller application.
Next, pour a small amount of the mixed coating onto the floor and spread it evenly using a roller. Work in small sections, overlapping each pass to ensure complete coverage. Avoid applying the coating too thickly, as this can lead to bubbling or other issues. Use a squeegee (optional) to help spread the coating evenly and eliminate air bubbles.
If using a flake system, broadcast the flakes onto the wet coating immediately after application. Distribute the flakes evenly across the floor surface. Allow the coating to cure completely before sweeping or vacuuming up any loose flakes.
Spiked shoes can be worn during the application process to prevent footprints and allow for easy movement across the wet coating. These shoes have spikes on the soles that minimize contact with the surface.
Allow the coating to cure completely according to the manufacturer's instructions. This typically takes several days, depending on the type of coating and the ambient temperature and humidity. Avoid walking or driving on the floor during the curing process.
Proper ventilation is critical during the application and curing of garage floor coatings. Open windows and doors to allow fresh air to circulate. Use fans to improve air flow if necessary. Wear a respirator to protect yourself from harmful fumes.
After the coating has cured, inspect the floor for any imperfections or missed spots. Touch up any areas as needed. Apply a second coat of coating, if desired, to enhance durability and provide a more uniform finish. Ensure the first coat is fully cured before applying the second coat.
Maintaining a coated garage floor is relatively simple. Sweep or vacuum regularly to remove dirt and debris. Clean spills immediately with a mild detergent and water. Avoid using harsh chemicals or abrasive cleaners, as these can damage the coating. Consider using floor mats in areas subject to heavy traffic or spills.
By following these steps and adhering to best practices, one can achieve a professionally coated garage floor that enhances the appearance and functionality of the garage for years to come. A well-prepared surface, a carefully selected coating system, and meticulous application are the keys to a successful and long-lasting outcome. Always consult the manufacturer's instructions for specific guidelines and recommendations regarding the chosen coating system.

Garage Floor Coat Comprehensive Step By Guide Builds Maz

Diy Garage Floor Coating

Decorative Garage Floor Coating Mistakes To Avoid And What Expect Akron Columbusknowing How In A Project Part 1 Of

Flooring Garage Cost And Installation Guide Xps

Floor Coatings 10 Tips For New Construction Of Concrete Floors

Watch This Before You Waste Thousands Trying To Renew Your Garage Floor Stone Coat

What Are The Best Clear Coats For Garage Floor Coatings All Floors

4 Types Of Concrete Floor Coatings And What You Should Know About Each

Decorative Garage Floor Coating Mistakes To Avoid And What Expect Akron Columbusknowing How In A Project Part 1 Of

Painting Your Garage Floors Do S Dont Making Pretty Spaces Blog