How to Change Garage Door Windows
Garage door windows enhance the aesthetic appeal of a home and allow natural light to illuminate the garage interior. Over time, these windows can become damaged, cracked, or simply outdated, necessitating replacement. Replacing a garage door window is a manageable project for individuals with basic DIY skills, though safety precautions should always be prioritized. This article provides a comprehensive guide on how to safely and effectively change garage door windows, covering essential tools, step-by-step procedures, and potential challenges.
Key Point 1: Preparation and Safety
Before initiating any work on a garage door, prioritizing safety is paramount. Garage doors are heavy and operate under significant spring tension, which can pose serious risks if mishandled. Disconnecting the garage door opener is the first crucial step. This prevents the door from accidentally activating while the window is being replaced. Locate the power outlet for the opener and unplug it completely. If the opener is hardwired, switch off the corresponding circuit breaker in the electrical panel.
Next, assess the type of garage door and window being addressed. Garage doors are commonly constructed from steel, aluminum, or wood, and the window retention methods vary accordingly. Some windows are held in place with retaining clips, while others are sealed with caulk or glazing compound. Identifying the retention method will dictate the tools and techniques required for removal.
Proper safety gear is also essential. Safety glasses are crucial to protect the eyes from debris that may dislodge during the removal process. Work gloves provide a better grip and protect hands from sharp edges. Consider using a ladder if the window is located high on the door, ensuring it is stable and positioned on a level surface. For heavier doors, a helper is highly recommended to assist with maneuvering and support.
Gathering the necessary tools and materials before starting saves time and minimizes interruptions. Essential tools typically include: a putty knife or scraper, a flathead screwdriver, a Phillips head screwdriver (if applicable), a utility knife, a measuring tape, caulk gun, and appropriate safety glasses and gloves. The replacement window should be the exact size and type as the original. High-quality exterior-grade caulk is necessary to create a weatherproof seal around the new window.
Key Point 2: Removing the Old Window
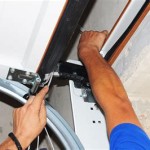
The process of removing the old garage door window depends on the method used to retain it. If the window is held in place with retaining clips, locate them around the perimeter of the window frame on the interior side of the door. Use a flathead screwdriver to carefully pry the clips away from the window frame. Gently push the window outwards from the inside. If the clips are brittle or corroded, they may break during removal. Replacements should be available at most hardware stores. If the window is sealed with caulk, use a utility knife to score along the edges where the window frame meets the garage door panel. This will break the caulk seal and prevent damage to the door’s surface.
If the window is secured with glazing compound, a putty knife or scraper will be required. Soften the glazing compound with a heat gun on a low setting if it is very hard and brittle. Carefully insert the putty knife between the window frame and the glazing compound, gently working around the perimeter to loosen it. Avoid applying excessive force, as this can damage the window or the surrounding door panel.
Once the window is loose, carefully push it outwards from the inside. If it is particularly stubborn, use a flathead screwdriver to gently pry it out, taking care not to scratch or dent the garage door. After the window is removed, thoroughly clean the opening. Use a scraper to remove any remaining caulk, glazing compound, or debris. A clean surface ensures a proper seal for the new window. Inspect the surrounding area for any damage, such as rust or rot, and address it before installing the replacement window. For instance, minor rust can be treated with a wire brush and rust-inhibiting primer.
Key Point 3: Installing the New Window and Securing the Seal
Before installing the new window, dry-fit it into the opening to ensure it fits properly. If the fit is too tight, slightly enlarge the opening using a file or sandpaper. If the fit is too loose, shims can be used to create a snug fit. Apply a bead of high-quality exterior-grade caulk around the perimeter of the window opening on the garage door. The thickness of the caulk bead should be sufficient to create a weatherproof seal when the window is installed. Ensure that the caulk covers the entire surface where the window frame will make contact with the door.
Carefully insert the new window into the opening from the outside. Press it firmly against the door panel, ensuring it is flush and level. If the window is secured with retaining clips, insert them around the perimeter of the window frame on the interior side of the door. Ensure the clips are properly seated and hold the window firmly in place. If the window is not secured with clips, use temporary clamps or tape to hold it in place while the caulk cures.
After the window is installed and secured, clean up any excess caulk that has squeezed out around the edges. Use a damp cloth or sponge to smooth the caulk bead and create a professional finish. Allow the caulk to cure according to the manufacturer’s instructions. Typically, this requires 24 to 48 hours. During this time, avoid operating the garage door to prevent disturbing the seal.
Once the caulk is fully cured, inspect the window for any gaps or weaknesses in the seal. If any are found, apply additional caulk to fill them. If the window is exposed to direct sunlight or extreme weather conditions, consider applying a layer of sealant over the caulk for added protection.
After the new window has been successfully installed and the caulk is dry, conduct a thorough inspection of the work done. Check the window for any signs of movement or instability. Make sure the door operates smoothly and without any resistance. If any issues are detected, reassess and correct them immediately. If issues such as door balance or spring tension are present, contact a professional for assistance. Once a full inspection has been performed, the final step is to reconnect the garage door opener. Restore power to the unit by plugging it back into the outlet or switching the circuit breaker back on. Test the garage door opener to ensure it is functioning properly. Observe the door as it opens and closes, paying attention to any unusual noises or movements. If the opener does not function as expected, consult the owner's manual or contact a qualified technician.
Properly installed and sealed garage door windows not only enhance the appearance of the home but also improve energy efficiency by allowing natural light in, reducing the need for artificial lighting during the day. By following these steps carefully, changing garage door windows becomes a manageable DIY project that can add value and functionality to any home.

Garage Door Window Replacement How To Guide Clopay

How To Change A Garage Door Window Youtube

3 Ways To Add Curb Appeal A Garage Door 5 Steps With S Instructables

Garage Door Window Replacement

Garage Door Window Replacement Tips Tricks

How To Replace A Broken Garage Door Glass Window Jb Repair Las Vegas Nv

Clopay Garage Door Classic Collection Snap In Decorative Window Insert Removal And Replacement

Garage Door Window Replacement In Toronto On

3 Ways To Add Curb Appeal A Garage Door 5 Steps With S Instructables

Steel Garage Door Installation Queens Repair