How Do You Program A Garage Door Remote?
Garage door openers have become an indispensable part of our daily lives, providing us with convenient and secure access to our homes. However, when it comes to programming or reprogramming a garage door remote, many homeowners may find themselves scratching their heads.
Programming a garage door remote is a relatively straightforward process that usually takes a few simple steps. By following these steps carefully, you can ensure that your remote works seamlessly with your garage door opener and provides you with peace of mind.
Step 1: Safety First
Before you begin programming your remote, it's crucial to take safety precautions. Always start by disconnecting the power to the garage door opener from the circuit breaker panel. This will prevent unintentional movement of the door during the programming process.
Step 2: Locate the Learn Button
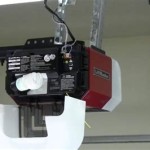
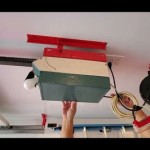
With the power disconnected, locate the "Learn" button on your garage door opener. This button is typically situated on the opener unit itself, near the motor or antenna.
Most garage door openers have a small LED light next to the "Learn" button. This light will help you understand the programming status.
Step 3: Put the Opener into Programming Mode
Press and hold the "Learn" button on the opener unit. Continue holding the button until the LED light starts flashing or the opener emits a series of beeps. This indicates that the opener is now in programming mode.
Step 4: Activate the Remote
Within 30 seconds of putting the opener into programming mode, press and hold the desired button on your remote control. Keep holding the button until the LED light on the opener stops flashing or the beeping sound stops.
Some remotes may require you to press the button multiple times within a short interval to successfully program the remote.
Step 5: Repeat for Additional Remotes
If you wish to program multiple remotes, follow the same steps for each remote. Repeat steps 3 and 4 for each additional remote you want to program.
Step 6: Test the Remote
Once all the remotes are programmed, restore power to the garage door opener and test the operation of each remote. Ensure that the door opens and closes smoothly and responds promptly to the remote commands.
Step 7: Store the Remotes Safely
Store the programmed remotes in a safe and accessible location. Make sure they are kept away from moisture, extreme heat, or any potential damage.
Additional Tips:
- If you encounter any difficulties during the programming process, refer to your garage door opener's user manual for specific instructions.
- Some newer garage door openers may have advanced features, such as rolling code technology, which requires a slightly different programming procedure. Consult your user manual for details.
- If you have lost or damaged your original remote and need to program a new one, you may need to contact the manufacturer or a professional technician for assistance.

How To Program A Remote Garage Door Opener Odyssey Destiny Openers Codedodger 1

How To Program A Garage Door Remote Change Battery Liftmaster Chamberlain

How To Program A Universal Garage Door Opener Remote Control

How To Program A Remote For Chamberlain Liftmaster Craftsman Garage Door Opener Setup Process Youtube

How To Program A Liftmaster Garage Door Opener Remote

Programming A Chamberlain Garage Door Opener Easy Steps

How To Program A Universal Garage Door Opener Remote Youtube

How To Program A Garage Door Opener Your Car Easy Steps

Add Or Reprogram A Garage Door Remote

How To Program Liftmaster Remote Controls Doorvana Garage Doors