Genie Garage Door Openers Installation
Genie garage door openers are a popular choice for homeowners because they are reliable, durable, and easy to install. If you are looking to install a Genie garage door opener, there are a few things you need to know.
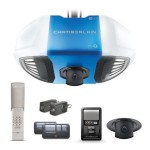
First, you need to choose the right opener for your garage door. Genie offers a variety of models to choose from, so you can find one that fits your needs and budget. Once you have chosen an opener, you need to gather the necessary tools and materials.
Here is a list of the tools and materials you will need:
- Drill
- Screwdriver
- Wrench
- Level
- Extension ladder
- Safety glasses
- Genie garage door opener
- Installation manual
Once you have gathered the necessary tools and materials, you can begin the installation process. Here are the steps involved:
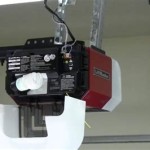
Step 1: Mount the head unit
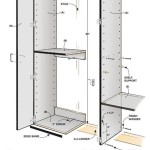
The first step is to mount the head unit to the ceiling of your garage. The head unit is the main component of the opener and it houses the motor and the gearbox. To mount the head unit, you will need to drill two holes in the ceiling and then insert the lag bolts that came with the opener. Once the lag bolts are in place, you can hang the head unit from the bolts.
Step 2: Install the motor
The next step is to install the motor to the head unit. The motor is responsible for opening and closing the garage door. To install the motor, you will need to insert the motor shaft into the gearbox and then tighten the set screws. Once the motor is in place, you can connect the wires from the head unit to the motor.
Step 3: Install the trolley
The trolley is the component that attaches to the garage door and moves it up and down. To install the trolley, you will need to attach the brackets to the door and then insert the trolley into the brackets. Once the trolley is in place, you can connect the wires from the motor to the trolley.
Step 4: Install the safety sensors
The safety sensors are designed to prevent the garage door from closing on a person or object. To install the safety sensors, you will need to attach the brackets to the door frame and then insert the sensors into the brackets. Once the sensors are in place, you can connect the wires from the head unit to the sensors.
Step 5: Program the remote control
The remote control is used to open and close the garage door from a distance. To program the remote control, you will need to follow the instructions that came with the opener. Once the remote control is programmed, you can test the opener by opening and closing the garage door.
Installing a Genie garage door opener is a relatively simple process that can be completed in a few hours. By following these steps, you can ensure that your opener is installed correctly and safely.

Replace And Install A Genie Garage Door Opener Very Old Youtube

The Only Video You Need For Installing A Garage Door Opener Genie

Genie Chainmax 1000 Essentials 3 4 Hpc Chain Drive Garage Door Opene The Company

How To Install Genie Belt Drive Garage Door Opener W Battery Backup Model 1055

Garagemax Bluemate Labs Inc

Genie Garage Door Openers Austin Repair Installation

Genie Signature Series 2 Hpc Screw Drive Wi Fi Enabled Smart Home Garage Door Ebay

Chain Drive 550 1 2 Hpc Garage Door Opener With Added Wireless Keypad The Genie Company

Replacing Installing A Genie Garage Door Opener Youtube

Genie Quietlift Garage Door Opener Installation And Setup Youtube
See Also