Craftsman Garage Door Opener Wall Control Replacement: A Comprehensive Guide
The Craftsman garage door opener is a widely used and reliable system for automating garage access. A crucial component of this system is the wall control, often referred to as the wall button or wall console. This device allows for convenient operation of the garage door from inside the garage. Over time, however, the wall control can malfunction due to various factors, necessitating replacement. This article provides a detailed guide on replacing a Craftsman garage door opener wall control, covering troubleshooting, component identification, replacement steps, and safety considerations.
Troubleshooting is the first step in determining whether a replacement is truly necessary. Before assuming the wall control is faulty, other potential issues should be ruled out. These include power supply problems, obstruction sensor malfunctions, and issues with the garage door opener motor itself. If the garage door opener fails to respond to the wall control, but functions correctly using the remote control, the issue is likely isolated to the wall control or its wiring.
A visual inspection of the wall control should be performed. Look for any signs of physical damage, such as cracks, loose connections, or corrosion. The wiring connecting the wall control to the garage door opener unit should also be inspected for breaks, frays, or loose connections. Often, a simple reconnection of a loose wire can resolve the problem. However, if damage is evident, or reconnection does not resolve the issue, replacement is the most practical solution.
Identifying the Correct Replacement Wall Control
Selecting the correct replacement wall control is essential for ensuring compatibility and proper functionality. Craftsman garage door openers have evolved over time, with different models utilizing different types of wall controls. Identifying the model number of your garage door opener is the first step in determining the appropriate replacement. This information is typically found on a label affixed to the garage door opener motor unit in the garage.
Once the model number is obtained, it can be used to research compatible wall controls. Craftsman offers a variety of wall control models, ranging from basic push-button units to more advanced consoles with features such as motion detection, timer-to-close functionality, and security lockouts. It's important to note that older models may not be compatible with newer, feature-rich wall controls. Compatibility information is generally available on the Craftsman website, in the owner's manual, or through authorized Craftsman retailers.
In addition to model number compatibility, it is also crucial to consider the wiring configuration. Craftsman wall controls typically connect to the garage door opener unit using two or three wires. The wiring configuration must match between the original and replacement wall control. If the wiring configuration is different, the replacement wall control may not function correctly or could potentially damage the garage door opener system.
It is generally recommended to purchase a replacement wall control that is specifically designed for your Craftsman garage door opener model to guarantee compatibility and optimal performance. Universal wall controls are available, but they may not offer all the features of a dedicated Craftsman wall control and may require more complex installation procedures.
Step-by-Step Replacement Procedure
The replacement process should be performed with the garage door opener disconnected from the power supply. This is a critical safety precaution to prevent accidental activation of the door mechanism and potential injury. Locate the circuit breaker that controls the garage door opener and switch it to the OFF position, or unplug the unit from the electrical outlet.
Remove the old wall control from the wall. Most wall controls are mounted using screws or clips. Carefully unscrew or unclip the wall control from the wall. Once the wall control is detached, access the wiring connections on the back of the unit. Note the position of each wire before disconnecting them. Taking a photograph of the wiring configuration can be helpful for reference during the installation of the new wall control.
Disconnect the wires from the old wall control. Use a small screwdriver to loosen the terminal screws, if applicable, and gently pull the wires free. If the wires are connected using wire nuts, carefully unscrew the wire nuts and separate the wires. Ensure that the wires are not damaged during this process. If the wires are frayed or corroded, strip back a small portion of the wire to expose fresh copper.
Connect the wires to the new wall control, matching the configuration of the old wall control. Securely tighten the terminal screws or wire nuts to ensure a solid connection. Double-check the wiring configuration to ensure that the wires are connected to the correct terminals. An incorrect wiring configuration can prevent the wall control from functioning properly or could damage the garage door opener system.
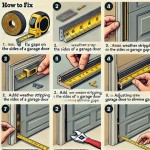
Mount the new wall control to the wall. Align the wall control with the mounting holes and secure it using the screws or clips provided. Ensure that the wall control is mounted securely and that it is level. A loose or misaligned wall control can be unsightly and may also be prone to damage.
Restore power to the garage door opener by switching the circuit breaker to the ON position or plugging the unit back into the electrical outlet. Test the new wall control by pressing the button to activate the garage door. If the garage door does not respond, double-check the wiring connections and ensure that the power supply is functioning correctly. If the issue persists, consult the garage door opener owner's manual or contact a qualified technician.
Safety Precautions and Considerations
Safety should always be the primary concern when working with electrical equipment and garage door openers. Disconnecting the power supply is a crucial step in preventing electrical shock and accidental activation of the garage door mechanism. Ensure the power is disconnected before commencing any work on the wall control or its wiring.
Exercise caution when handling wires and tools. Use insulated tools to prevent electrical shock. If you are not comfortable working with electrical wiring, it is best to consult a qualified electrician or garage door technician.
Pay attention to the placement of the wall control. It should be mounted in a location that is easily accessible and visible. Avoid mounting the wall control near moving parts or in areas where it could be easily damaged. The wall control should also be mounted at a height that is out of reach of small children to prevent accidental operation of the garage door.
Regularly inspect the garage door opener system, including the wall control and wiring, for signs of damage or wear. Address any issues promptly to prevent further damage or potential safety hazards. Lubricate the garage door mechanism regularly to ensure smooth and reliable operation.
If the garage door opener is equipped with safety sensors, ensure that they are functioning correctly. The safety sensors are designed to prevent the garage door from closing if an obstruction is detected. Test the safety sensors regularly by placing an object in the path of the garage door and attempting to close the door. If the door does not reverse automatically, the safety sensors may need to be adjusted or replaced.
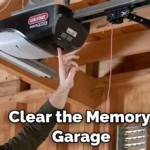
Programming may be required for some advanced wall controls with features like security lockouts or timer-to-close functionality. Refer to the garage door opener owner's manual for instructions on how to program these features. Follow the programming instructions carefully to ensure that the wall control functions correctly.
Proper disposal of the old wall control is also important. Electronic components should be disposed of in accordance with local regulations. Contact your local waste management authority for information on how to properly dispose of electronic waste.

How To Replace A Garage Door Opener Wall Control Repair Guide

Craftsman Garage Door Opener Wall Control 41a6317 Doityourself Com Community Forums

Replacing The Wall Control On A Garage Door Opener

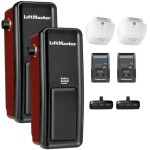
Sears Craftsman 139 53687 Compatible Multi Function Garage Door Control Panel By Liftmaster

Sears Craftsman Garage Door Remote Compatibility Chart

Craftsman 53687 Garage Door Opener 3 Function Wall Button Console 14sr438b Ebay

Sears Craftsman 139 53687 Compatible Multi Function Garage Door Control Panel By Liftmaster

Garage Door Wall Controller Upgrade Replacement Guide Save 100 In Labor Fees With An Easy Fix

041a7327 1 Motion Detecting Wall Control Panel Parts Chamberlain

Making Your Garage Door Opener Compatible Tips Tricks Wyze Forum