Connecting Liftmaster Garage Door Opener
LiftMaster garage door openers are a convenient and secure way to open and close your garage door. They come with a variety of features, including remote control, keypad entry, and motion detection. Connecting a LiftMaster garage door opener is a relatively simple process, but there are a few things you need to do to make sure it works properly.
1. Gather Your Tools
Before you start, you will need to gather a few tools, including:
- A screwdriver
- A drill
- A wire cutter
- A level
- A tape measure
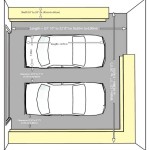
2. Choose a Location for the Opener
The first step is to choose a location for the opener. The opener should be mounted on a wall or ceiling that is at least 7 feet high. It should also be located within 10 feet of the garage door. If the distance is more than 10 feet, you may purchase an extension kit.
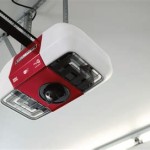
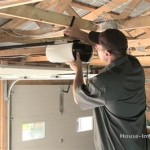
3. Mount the Opener
Once you have chosen a location, you can mount the opener. The opener comes with a mounting bracket that you will need to attach to the wall or ceiling. Use the screws that came with the opener to secure the bracket. Make sure the opener is level before you tighten the screws.
4. Connect the Wires
The next step is to connect the wires. The opener comes with a wiring harness that has four wires: red, black, white, and green. The red and black wires are the power wires. The white wire is the ground wire. The green wire is the control wire.
Connect the red wire to the terminal on the opener that is marked "L1". Connect the black wire to the terminal that is marked "L2". Connect the white wire to the terminal that is marked "GND". Connect the green wire to the terminal that is marked "COM".
5. Program the Remote
Once the wires are connected, you can program the remote. The remote comes with a programming button that you will need to press. Once you press the button, you will need to enter a code. The code is usually printed on the back of the remote. Once you have entered the code, the remote will be programmed.
6. Test the Opener
Once the remote is programmed, you can test the opener. Press the button on the remote to open the garage door. The door should open smoothly and quietly. If the door does not open, check the connections to make sure they are secure.
Connecting a LiftMaster garage door opener is a simple process that can be completed in a few minutes. By following these steps, you can ensure that your opener works properly and securely.

Connecting The Garage Door Control Wire

How To Program A Liftmaster Garage Door Opener Remote

Liftmaster Myq Not Connecting To Wi Fi Solved

Set Garage Door Travel Max Up And Down Liftmaster Myq

Connecting The Garage Door Control Wire

How To Install And Connect A Next Generation Liftmaster Belt Drive Garage Door Opener Youtube

Learn Button On A Liftmaster Garage Door Opener Doorvana Doors

How To Reset A Liftmaster Garage Door Opener Quickly

Counter Wiring For A Liftmaster Operator Ddm Garage Doors Blog Dan S Door

Smart Garage Door Opener For Liftmaster Lm100evf Ismartgate