Chamberlain Wall Mount Garage Door Opener Installation: A Comprehensive Guide
Wall mount garage door openers, also known as jackshaft openers, offer a space-saving alternative to traditional ceiling-mounted systems. They are particularly useful in garages with low headroom, obstructed ceilings, or those requiring extra storage space overhead. Chamberlain, a well-known manufacturer of garage door openers, offers a range of wall mount models that provide reliable operation and advanced features. This article details the process of installing a Chamberlain wall mount garage door opener, emphasizing critical steps and considerations to ensure a safe and functional installation.
Before beginning the installation, it's crucial to ascertain compatibility. Wall mount openers are designed for sectional garage doors with a torsion spring system. This system utilizes a spring mounted horizontally above the door opening to balance the door's weight. Garage doors with extension spring systems, utilizing springs along the sides of the door, are generally not compatible with wall mount openers without significant modifications, which may void warranties and compromise safety. Furthermore, the door must be properly balanced and in good working condition before installation. Addressing any existing issues with the door's operation, such as binding or sticking, is paramount before installing the opener.
The installation process involves several stages, including preparing the garage, mounting the opener, connecting the wiring, installing safety sensors, and programming the system. A detailed understanding of each stage is essential for a successful and safe installation. Always consult the Chamberlain installation manual specific to the model being installed, as instructions can vary. This guide provides general information, but it is not a substitute for the manufacturer's instructions.
Key Point 1: Pre-Installation Preparations and Safety
Prior to commencing the physical installation, gathering all necessary tools and materials is essential. This typically includes a level, drill, various drill bits, socket set, wrenches, screwdrivers (both Phillips head and flathead), wire strippers, wire connectors, a measuring tape, and safety glasses. Having all these items readily available will streamline the process and minimize interruptions.
Safety should be the utmost priority throughout the installation. Disconnect the power supply to the existing garage door system at the circuit breaker. This prevents accidental activation of the old opener during the removal process, mitigating the risk of electrical shock or injury. Wear safety glasses to protect the eyes from debris. If working at heights, use a stable ladder or scaffolding and take appropriate precautions to prevent falls.
Remove the existing garage door opener and any associated hardware. This includes the opener unit, rail, and any sensors or controls connected to the old system. Carefully disconnect the wiring, noting the connections for future reference if needed. Dispose of the old opener and hardware responsibly.
Examine the garage door's torsion spring system. Ensure the springs are in good condition and properly tensioned. If the springs are damaged or show signs of wear, consult a qualified garage door technician for repair or replacement. Never attempt to adjust or repair torsion springs yourself, as they are under extreme tension and can cause serious injury.
The garage wall where the opener will be mounted must be structurally sound and capable of supporting the opener's weight and the forces generated during operation. If the wall is drywall, locate a wall stud to mount the opener bracket directly. If a stud is not available at the desired mounting location, consider using a suitable mounting board securely attached to multiple studs. This will provide a stable and secure platform for the opener.
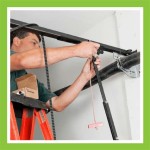
Key Point 2: Mounting and Wiring the Opener
The Chamberlain wall mount opener is typically mounted on the wall adjacent to the garage door, near the torsion spring assembly. The specific mounting location will depend on the garage's layout and the model of the opener. Refer to the installation manual for precise measurements and instructions.
Attach the mounting bracket to the wall, ensuring it is level and securely fastened. Use lag screws or other appropriate fasteners to secure the bracket to the wall stud or mounting board. The bracket must be able to withstand the forces exerted by the opener during operation. Double-check the bracket's stability before proceeding.
Carefully lift the opener unit and position it onto the mounting bracket. Secure the opener to the bracket using the provided hardware. Ensure the opener is level and properly aligned with the garage door. The opener should be positioned so that the drive shaft aligns with the torsion spring shaft.
Connect the opener's drive shaft to the torsion spring shaft. This typically involves using a coupling or adapter provided with the opener. Secure the coupling to both shafts using the provided hardware. Ensure the coupling is properly aligned and tightened to prevent slippage during operation. It is crucial to follow the manufacturer's instructions carefully when connecting the drive shaft to ensure proper engagement and prevent damage to the opener or door.
Run the wiring for the opener, safety sensors, and wall control. Most Chamberlain wall mount openers utilize low-voltage wiring for these components. Route the wiring neatly and securely, using staples or wire ties to prevent it from hanging loose or interfering with the door's operation. Connect the wiring to the opener unit according to the wiring diagram in the installation manual. Ensure all connections are secure and properly insulated.
The wiring typically includes connections for power, safety sensors, and the wall control. The power connection usually requires a standard electrical outlet near the opener. If an outlet is not available, a qualified electrician should install one. The safety sensors are essential for preventing the door from closing on obstructions. The wall control allows for convenient operation of the opener from inside the garage.
Key Point 3: Installing Safety Sensors and Programming
Safety sensors are a critical component of any garage door opener system. They are designed to prevent the door from closing if an obstruction is detected in the door's path. Chamberlain wall mount openers typically utilize photoelectric sensors that emit an infrared beam across the door opening. If the beam is broken, the door will stop and reverse direction.
Mount the safety sensors on either side of the garage door opening, near the floor. The sensors should be positioned so that the infrared beam is parallel to the floor and unobstructed. Ensure the sensors are securely mounted and properly aligned. The installation manual will provide specific instructions on sensor placement and alignment.
Connect the sensor wiring to the opener unit, following the wiring diagram in the installation manual. Ensure the wiring is properly connected and secured. Test the sensors by obstructing the infrared beam while the door is closing. The door should stop and reverse direction. If the sensors are not functioning correctly, troubleshoot the wiring and alignment, or consult the installation manual for further assistance.
Install the wall control in a convenient location inside the garage, typically near the service door. Connect the wall control wiring to the opener unit, following the wiring diagram in the installation manual. The wall control usually includes buttons for opening and closing the door, as well as a light control button.
Once all components are installed and wired, restore power to the garage door system at the circuit breaker. The opener should now be ready for programming. The programming process typically involves setting the door's travel limits and force settings. The travel limits determine how far the door opens and closes, while the force settings determine how much force the opener applies to the door. Refer to the installation manual for specific programming instructions.
Test the opener's operation thoroughly. Open and close the door several times, ensuring it operates smoothly and safely. Check the safety sensors to verify they are functioning correctly. Adjust the travel limits and force settings as needed to ensure proper operation. If any issues arise, consult the installation manual or contact Chamberlain customer support for assistance.
Following the installation, perform regular maintenance to ensure the opener continues to operate safely and reliably. This includes lubricating the door's moving parts, checking the safety sensors, and inspecting the wiring. Periodically test the opener's safety features to verify they are functioning correctly. With proper installation and maintenance, a Chamberlain wall mount garage door opener can provide years of reliable service.

Garage Remodel Installing The Wall Mount Door Opener Chamberlain Rjo70 Technology Fail

Rjo101 Wall Mount Battery Backup Wi Fi Garage Door Opener Chamberlain

Chamberlain Wall Mount Garage Door Opener Youtube

Chamberlain Wall Mount Garage Door Opener Rjo70 User Guide

Wall Mount Garage Door Opener Install Chamberlain Rjo70

How To Install The Chamberlain Wall Mount Garage Door Opener Model Rjo101

Reviews For Chamberlain Wall Mount Drive Ultra Quiet Smart Garage Door Opener With Battery Backup And Wifi Connection Pg 4 The Home

Rjo101 Wall Mount Battery Backup Wi Fi Garage Door Opener Chamberlain

Rjo101 Wall Mount Battery Backup Wi Fi Garage Door Opener Chamberlain

Chamberlain Wall Mount Garage Door Opener With Wi Fi Connection Rjo101 Acme Tools