Chamberlain Garage Door Opener Flashing Light: Troubleshooting Guide
A flashing light on a Chamberlain garage door opener is a common indicator of a problem, often signaling a safety feature has been triggered or a malfunction has occurred within the system. Understanding the meaning of the flashing light and employing systematic troubleshooting steps can help diagnose and resolve the issue, avoiding the need for professional repair in some cases. This article will explore the various reasons behind a flashing light on a Chamberlain garage door opener and provide a comprehensive guide to identify and address the underlying problems.
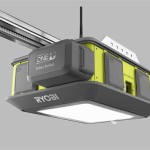
The Chamberlain garage door opener utilizes a system of flashing lights to communicate different operational states and potential issues to the user. The main unit, typically mounted on the ceiling, houses an indicator light that can flash in various patterns. These patterns are not arbitrary; they represent specific error codes or operational signals. Recognizing these patterns is crucial for pinpointing the source of the problem.
Before attempting any troubleshooting, it is important to prioritize safety. Disconnect the garage door opener from the power outlet before performing any inspections or repairs. Ensure the area around the garage door is clear of obstructions and that no individuals or pets are in the vicinity. If unsure about any aspect of the troubleshooting process, consulting a qualified garage door technician is recommended.
Understanding the Common Causes of a Flashing Light
Several factors can trigger a flashing light on a Chamberlain garage door opener. Identifying the specific reason requires careful observation and a process of elimination. The most frequent causes include safety sensor obstruction, issues with the door itself, remote control problems, and internal malfunctions within the opener unit.
One of the most prevalent reasons for a flashing light is an obstruction in the path of the safety sensors. These sensors, located near the floor on either side of the garage door opening, are designed to prevent the door from closing if an object or person is detected. If the sensors are misaligned, dirty, or blocked by an object, the garage door opener will interpret this as an obstruction and prevent the door from closing, causing the light to flash. This is a critical safety feature designed to prevent injury or damage.
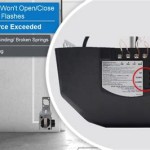
Another potential cause is a problem with the garage door itself. A door that is unbalanced, binding, or encountering excessive resistance can trigger the safety mechanism and cause the light to flash. This can be due to issues with the springs, rollers, tracks, or hinges. If the door is difficult to open or close manually, it is a strong indication that there is a mechanical problem that needs to be addressed.
Remote control issues, although less common, can also contribute to a flashing light. A malfunctioning remote, depleted batteries, or interference from other devices can prevent the remote from properly communicating with the opener, resulting in the flashing light. In some cases, reprogramming the remote or replacing the batteries may be sufficient to resolve the issue.
Finally, internal malfunctions within the garage door opener unit itself can lead to a flashing light. These malfunctions can range from issues with the circuit board to problems with the motor or other internal components. Diagnosing these types of issues often requires specialized knowledge and equipment.
Troubleshooting Steps for a Flashing Light
The following steps outline a systematic approach to troubleshooting a Chamberlain garage door opener with a flashing light. Each step focuses on a specific potential cause and provides guidance on how to identify and address the problem. Start with the simplest solutions first and gradually move towards more complex troubleshooting methods.
The first step is to inspect the safety sensors. Ensure that the sensors are properly aligned and that there are no obstructions in their path. Clean the lenses of the sensors with a soft cloth to remove any dirt or debris. If the sensors are misaligned, gently adjust them until they are pointing directly at each other. A solid green light on one sensor and a solid or blinking amber light on the other typically indicates proper alignment. If one or both sensors are not lit, check the wiring connections to ensure they are secure and undamaged.
Next, examine the garage door itself. Manually disconnect the door from the opener and attempt to open and close it. If the door is difficult to move or encounters significant resistance, investigate the springs, rollers, tracks, and hinges. Lubricate the moving parts with a garage door lubricant and check for any signs of damage or wear. If the springs are broken or excessively worn, replacing them is crucial for safe and reliable operation.
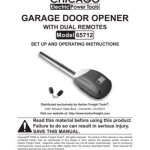
After addressing the safety sensors and the garage door, focus on the remote control. Replace the batteries in the remote and try operating the door. If the remote still does not work, attempt to reprogram it to the opener. Refer to the owner's manual for specific instructions on reprogramming the remote. If there are multiple remotes, test each one individually to determine if the problem is isolated to a single remote. If all remotes fail to operate the door, the issue may lie within the opener's receiver.
If the problem persists after checking the safety sensors, door, and remote, inspect the wiring connections throughout the system. Look for any loose, frayed, or damaged wires. Secure any loose connections and repair or replace any damaged wires. Pay close attention to the wiring connections at the safety sensors, the opener unit, and the wall-mounted control panel.
If none of the above steps resolve the issue, the problem may stem from an internal malfunction within the garage door opener unit. In this case, consult the owner's manual or contact a qualified garage door technician for further assistance. Attempting to repair internal components without proper training and experience can be dangerous and may void the warranty.
Decoding the Flashing Light Patterns
Chamberlain garage door openers use different flashing light patterns to indicate specific problems. Understanding these patterns can significantly expedite the troubleshooting process. The owner's manual provides a detailed explanation of each flashing light pattern, but some common patterns and their associated meanings are outlined below.
A single flash often indicates that the safety sensors are blocked or misaligned. As previously discussed, this is a common issue and can be resolved by inspecting and adjusting the sensors. Clearing any obstructions and ensuring proper alignment should eliminate the single flash.
Two flashes may indicate a problem with the wiring of the safety sensors or the safety sensor circuit within the opener unit. Check the wiring connections to the sensors and the opener, ensuring they are secure and undamaged. If the wiring appears to be in good condition, the issue may be with the sensor circuit itself, requiring professional repair.
Multiple flashes, typically more than five, can indicate a more complex problem, such as a motor issue, a circuit board malfunction, or a problem with the travel limits. The number of flashes often corresponds to a specific error code, which can be deciphered using the owner's manual or by contacting Chamberlain customer support. These types of issues often require professional diagnosis and repair.
A slow, continuous flash may indicate that the opener is in programming mode or that it is experiencing a power surge. If the opener is not intentionally being programmed, try unplugging it for a few minutes to reset it. If the flashing persists, check the power supply and ensure that the opener is receiving adequate voltage. A power surge can sometimes damage the internal components of the opener, requiring repair or replacement.
It is important to note that the specific flashing light patterns and their meanings may vary slightly depending on the model of the Chamberlain garage door opener. Consulting the owner's manual for the specific model is always recommended to ensure accurate diagnosis and troubleshooting.
In conclusion, a flashing light on a Chamberlain garage door opener signals a problem that requires attention. By understanding the common causes, employing systematic troubleshooting steps, and decoding the flashing light patterns, individuals can often diagnose and resolve the issue without professional assistance. However, safety should always be the top priority, and if unsure about any aspect of the troubleshooting process, consulting a qualified garage door technician is always recommended.

Garage Opener Light Blinking A Troubleshooting Guide

New Chamberlain Garage Door Opener Will Not Open Flashes 2 Times Youtube

Garage Door Won T Close And Light Flashes How To Fix Easy

Garage Door Lights Flashing Flickering Most Common Causes
Chamberlain Garage Door Opener Troubleshooting Tips Guide

How To Fix A Garage Door Opener That Won T Close The Lights Blink 10 Times

Garage Door Opener Flashing Light San Diego Ca Understanding The Reasons Behind A

Fixing Chamberlain Garage Door Error 4 Flashes Sensor Misalignment Solved

Why Is My Garage Opener Light Blinking The Door House

Garage Door Opener Flashing Here S How To Fix It Fast
See Also