Chamberlain Garage Door Opener Belt Replacement: A Comprehensive Guide
The Chamberlain garage door opener, particularly models utilizing a belt drive system, offer a smooth and quiet operation preferred by many homeowners. However, like any mechanical device, components of the garage door opener, including the belt, are subject to wear and tear over time. When the belt shows signs of deterioration or failure, a replacement becomes necessary to ensure continued reliable performance and prevent potential safety hazards. This article provides a detailed guide to Chamberlain garage door opener belt replacement, covering the identification of a failing belt, preparation for the replacement procedure, the step-by-step instructions for the replacement itself, and essential post-replacement checks.
A malfunctioning or broken garage door opener belt can manifest in several ways. The garage door may struggle to open or close completely, exhibiting jerky movements or stopping intermittently during operation. Unusual noises, such as a snapping or grinding sound, emanating from the opener unit may also indicate a problem with the belt. Visual inspection of the belt can reveal signs of wear, including fraying, cracking, or stretching. If any of these symptoms are observed, it is crucial to promptly address the issue by replacing the belt to avoid further damage to the opener and ensure the safe operation of the garage door.
Identifying a Failing Garage Door Opener Belt
Accurate identification of a faulty belt is the first step toward a successful replacement. The following signs can help determine if a Chamberlain garage door opener belt needs replacement:
Visual Inspection: A thorough visual inspection of the belt is paramount. Look for any signs of degradation, such as cracks, fraying, or separation of the belt material. Stretching, which can cause the belt to sag, is another indicator of wear. Compare the belt's current condition to its original state, if possible, or consult the manufacturer's specifications for acceptable tolerances. Any significant deviations warrant replacement.
Operational Performance: Observe the garage door's movement as it opens and closes. A failing belt often results in erratic operation. The door may exhibit jerky or uneven movements, struggle to lift or lower, or stop abruptly during its cycle. The door may also fail to reach its fully open or fully closed position, requiring manual intervention. These performance issues directly point to a compromised belt.
Audible Indicators: Listen carefully for unusual noises coming from the opener unit during operation. A damaged belt can produce snapping, grinding, or squealing sounds as it moves along the drive mechanism. These sounds are often a result of the belt slipping or encountering increased friction due to wear. Unusual noises associated with garage door operation should always be investigated, and a belt replacement should be considered if the source of the noise is traced back to the belt.
Age of the Belt: While not always a definitive indicator, the age of the belt is a factor to consider. Even if visual signs of damage are not immediately apparent, belts have a limited lifespan. A belt that has been in service for several years may be nearing the end of its useful life and prone to failure. Refer to the manufacturer's recommendations for the expected lifespan of the belt, and consider replacing it preventively if it is approaching or exceeding that timeframe.
Confirming the belt as the source of the problem is crucial. Other components of the garage door opener, such as the motor, gears, and trolley, can also cause similar symptoms. Before proceeding with a belt replacement, rule out these other potential causes through careful inspection and troubleshooting. If all other components appear to be functioning correctly, and the signs point definitively to a failing belt, then replacement is the appropriate course of action.
Preparing for Chamberlain Garage Door Opener Belt Replacement
Prior to commencing the belt replacement process, thorough preparation is essential to ensure a safe and efficient procedure. This preparation involves gathering the necessary tools and materials, disconnecting power to the opener, and preparing the garage door itself.
Gathering Tools and Materials: The required tools and materials for the replacement include:
New Chamberlain Garage Door Opener Belt: Obtain a replacement belt specifically designed for the Chamberlain model in question. Verify the part number and compatibility to ensure proper fit and function. Ordering directly from Chamberlain or a reputable supplier is recommended.
Wrench Set: A set of adjustable or open-end wrenches will be needed to loosen and tighten the nuts and bolts securing the belt and related components.
Screwdrivers: Both Phillips-head and flat-head screwdrivers may be required to remove covers and access various parts of the opener unit.
Pliers: Pliers can be useful for gripping and manipulating small parts, as well as for adjusting the belt tension.
Ladder: A sturdy ladder is necessary to safely reach the garage door opener unit, which is typically mounted on the ceiling.
Safety Glasses: Eye protection is crucial to safeguard against debris that may fall during the replacement process.
Work Gloves: Gloves can protect the hands from dirt, grease, and sharp edges.
Disconnecting Power: Before starting any work on the garage door opener, it is imperative to disconnect the power supply. This can be done by unplugging the opener from the electrical outlet or by switching off the corresponding circuit breaker in the electrical panel. Disconnecting the power ensures that the opener cannot be accidentally activated during the replacement, preventing potential injury.
Preparing the Garage Door: The garage door should be manually disconnected from the opener before starting the replacement. This is usually accomplished by pulling the emergency release cord, which disengages the trolley from the drive mechanism. With the door disconnected, it can be moved freely by hand. Manually move the door to the fully closed position and secure it in place using clamps or locking pliers. This prevents the door from accidentally opening or closing during the replacement and creating a safety hazard.
Ensuring a properly prepared workspace is also crucial. Clear the area around the garage door opener of any obstructions. Provide adequate lighting to allow for clear visibility of the components being worked on. Having a clean and well-lit workspace increases efficiency and reduces the risk of errors during the replacement procedure.
Step-by-Step Instructions for Chamberlain Garage Door Opener Belt Replacement
With the necessary preparations complete, the actual belt replacement can begin. The following steps outline the procedure for replacing a Chamberlain garage door opener belt:
Remove the Opener Cover: Locate and remove the cover of the garage door opener unit. This typically involves unscrewing a few screws that secure the cover to the housing. Carefully detach the cover, taking note of its orientation for reinstallation.
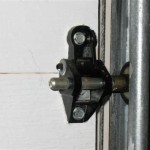
Detach the Old Belt: Identify the points where the belt is connected to the trolley and the motor pulley. Use a wrench or screwdriver to loosen the fasteners securing the belt at these points. Once loosened, the old belt can be carefully removed from the trolley and pulley. Note the routing of the belt around the pulley and trolley, as the new belt will need to be installed in the same manner.
Install the New Belt: Route the new belt around the motor pulley and attach it to the trolley. Ensure that the belt is properly aligned and that there are no twists or kinks. Secure the belt to the trolley and motor pulley using the fasteners that were previously removed. Tighten the fasteners securely, but avoid over-tightening, which could damage the belt or the components.
Adjust Belt Tension: Proper belt tension is crucial for optimal performance. Consult the Chamberlain garage door opener manual for the recommended belt tension specifications. Most Chamberlain models have a tension adjustment mechanism, typically a threaded rod or a tension spring. Use a wrench or pliers to adjust the tension until it meets the specified range. The belt should be taut but not excessively tight. Excessive tension can cause premature wear and damage, while insufficient tension can result in slippage and poor performance.
Reattach the Opener Cover: Once the new belt is installed and the tension is properly adjusted, reattach the opener cover. Align the cover with the housing and secure it with the screws that were previously removed. Ensure that the cover is properly seated and that the screws are tightened securely.
Reconnect Power and Test: Reconnect the power supply to the garage door opener by plugging it back into the electrical outlet or switching on the circuit breaker. Re-engage the trolley to the drive mechanism by pulling the emergency release cord again. Test the garage door opener by activating it using the wall switch or the remote control. Observe the door's movement as it opens and closes. Ensure that the door operates smoothly and without any unusual noises or jerky movements. If any issues are observed, recheck the belt installation, tension, and alignment.
After replacing the belt, it's important to properly dispose of the old one. Garage door opener belts are often made of reinforced rubber or synthetic materials that may not be readily recyclable. Check with local waste management authorities for guidelines on proper disposal methods in your area. Some auto parts stores or recycling centers may accept used rubber belts for recycling.
After successfully testing the operation, a few additional checks should be performed to ensure the system is fully functional and safe. Check the safety sensors located near the bottom of the garage door opening. These sensors should prevent the door from closing if an obstruction is detected. Test the sensors by placing an object, such as a cardboard box, in the path of the door while it is closing. The door should stop and reverse direction when the sensors are triggered. If the sensors are not functioning correctly, consult the garage door opener manual for troubleshooting instructions or contact a qualified technician.

041a5250 Belt Kit 7 Parts Chamberlain

041a5434 14a Belt Kit 10 Parts Chamberlain

Genuine New Chamberlain Garage Door Opener Replacement Belt 001a7904 2 001a50 7 Ebay

Aokur 41a5434 13a Garage Door Openers Belt Assembly With 8ft Walmart Com

Chamberlain Garage Door Opener 8 Ft Belt Rail Extension Kit In The Parts Accessories Department At Lowes Com

041a3589 3 Belt Kit 7 Parts Chamberlain

Genuine New Chamberlain Garage Door Opener Replacement Belt 001a7904 2 001a50 7 Ebay

Drive Belt 41a5434 11a 7ft Chamberlain Craftsman Garage Door Openers Assembly Compatible With Liftmaster Sentex Whisper

041a4885 5 Gear And Sprocket Kit Belt Drive Parts Chamberlain

Garage Door Opener Belt Replacement For Chamberlain Liftmaster Assembly Ebay