Replacement Remote Garage Door Opener
When your garage door opener's remote control stops working, it can be a major inconvenience. After all, you use it several times a day. The good news is, replacing a remote garage door opener is a relatively simple and inexpensive task. Here's a step-by-step guide on how to do it:
Gather the necessary tools and materials
Before you begin, gather the following tools and materials:
- New remote garage door opener - You can find these at most hardware stores or home improvement centers.
- Ladder - You'll need this to reach the opener motor unit.
- Phillips head screwdriver - This is used to remove the cover of the opener motor unit.
- Step stool - This is optional, but it can be helpful for reaching the opener motor unit if it's mounted high on the wall.
Safety first
Before you begin working on your garage door opener, make sure to disconnect the power to the unit. You can do this by flipping the circuit breaker or removing the fuse that powers the opener.
Locate the opener motor unit
The opener motor unit is usually mounted on the ceiling of your garage, directly above the garage door. It's a metal box with a motor and gears inside. Once you've located the opener motor unit, use the ladder to reach it.
Remove the cover of the opener motor unit
Use the Phillips head screwdriver to remove the screws that hold the cover of the opener motor unit in place. Once the screws are removed, carefully lift off the cover.
Locate the learn button
The learn button is usually a small, round button located on the circuit board inside the opener motor unit. It may be labeled "learn," "program," or "add remote."
Put the new remote into learn mode
Refer to the instructions that came with your new remote to put it into learn mode. This usually involves pressing and holding a button on the remote for a few seconds.
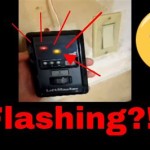
Press the learn button on the opener motor unit
Once the new remote is in learn mode, press the learn button on the opener motor unit. The LED light on the opener motor unit will start to flash.
Press the button on the new remote
Press the button on the new remote that you want to use to open and close your garage door. The LED light on the opener motor unit will stop flashing and stay lit.
Repeat for additional remotes
If you want to program additional remotes, repeat steps 6 and 7 for each remote.
Replace the cover of the opener motor unit
Once you've programmed all of the remotes, replace the cover of the opener motor unit and secure it with the screws.
Reconnect power to the garage door opener
Flip the circuit breaker back on or replace the fuse to reconnect power to the garage door opener.
Test the new remote
Press the button on the new remote to open and close your garage door. If the door opens and closes properly, you've successfully replaced the remote.

Overhead Door Acsto Replacement Remote Controls

Genie Garage Door Opener Remotes Replace Or Upgrade Tagged Replacement Remote The Company

2 Button Universal Garage Door Opener Remote Acsctg Replacement The Genie Company

Garage Door Opener Remotes The Home

Replace Your Garage Opener Remote Battery Easy Diy

Genie Universal 4 Button Garage Door Opener Remote Replacement For Ly All Remotes Gu4tg R

Aftermarket Remote Replacement Garage Opener Door One For All Control Made In Com

Acsctg Type 1 Replacement Button Remote Genie Intellicode The Company

How To Fix Garage Door Opener Remote Champion Repair

Replacement For Liftmaster 371lm Car Garage Door Remote Opener E32 Sale Online Ebay