How to Build a Garage Workbench
A workbench is an essential piece of furniture for any garage. It provides a sturdy and stable surface for working on projects, and it can also help to keep your tools organized. If you're looking to build a workbench, there are a few things you'll need to consider, including the size, shape, and materials.
The size of your workbench will depend on the size of your garage and the types of projects you plan to work on. If you have a small garage, you may want to build a smaller workbench that can be easily moved around. If you have a larger garage, you may want to build a larger workbench that can accommodate more tools and materials.
The shape of your workbench will also depend on the types of projects you plan to work on. If you're planning to do a lot of woodworking, you may want to build a workbench with a large, flat surface. If you're planning to do a lot of metalworking, you may want to build a workbench with a sturdy frame and a metal top.
The materials you use to build your workbench will also depend on the types of projects you plan to work on. If you're planning to do a lot of heavy-duty work, you may want to use sturdy materials like steel or concrete. If you're planning to do a lot of lighter-duty work, you may want to use less expensive materials like wood or plastic.
Once you've considered the size, shape, and materials for your workbench, you can begin building it. The following are the steps involved in building a basic workbench:
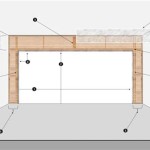
- Cut the legs and frame. The legs and frame of your workbench will provide the support for the top. The legs should be made of sturdy material like steel or wood. The frame should be made of a material that is strong enough to support the weight of the top and the tools you'll be using.
- Assemble the legs and frame. Once you've cut the legs and frame, you can assemble them using screws or bolts. Make sure the legs are securely attached to the frame.
- Attach the top. The top of your workbench can be made of a variety of materials, including wood, metal, or plastic. The top should be thick enough to support the weight of the tools and materials you'll be using.
- Install the drawers and shelves. If you want to add drawers or shelves to your workbench, you can do so after the top has been attached. Drawers are a great way to store tools and materials, and shelves can be used to store larger items.
- Finish the workbench. Once you've assembled the workbench, you can finish it by applying a sealant or paint. This will help to protect the workbench from the elements and make it more durable.

Build A Basic Workbench Tylynn M

How To Build A Workbench The Best Way

How To Build A Diy Workbench Super Simple 50 Bench

Cheap And Easy Garage Workbench 3 Steps Instructables

Two Hour Diy Workbench Free Plans Honeybear Lane

Garage Workbench Plans Myoutdoorplans

How To Build The Ultimate Diy Garage Workbench Free Plans

14 Super Simple Workbenches You Can Build The Family Handyman

How To Build A Workbench For Garage Diy And Shelves

Easy Workbench Improvements Garage Upgrades Wilker Do S1
See Also