How To Connect Liftmaster Garage Door Opener
LiftMaster garage door openers are a great way to add convenience and security to your home. They can be programmed to open and close your garage door with the touch of a button, and they come with a variety of features that can help keep your family and property safe.
If you're new to LiftMaster garage door openers, or if you're just looking for a refresher, here's a step-by-step guide on how to connect your opener:
1. Gather Your Tools
Before you start, you'll need to gather a few tools:
- A ladder
- A screwdriver
- A pair of pliers
- Electrical tape
- A flashlight (optional)
2. Safety First
Before you begin working on your garage door opener, be sure to take the following safety precautions:
- Unplug the garage door opener from the power outlet.
- Disconnect the battery backup (if equipped).
- Make sure the garage door is closed and locked.
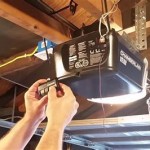
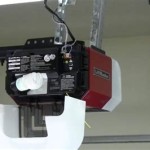
3. Locate the Control Panel
The control panel for your LiftMaster garage door opener is typically located on the back of the motor unit. It will have a number of buttons and LEDs, and it may also have a small LCD screen.
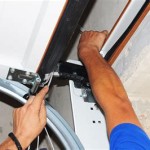
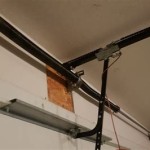
4. Connect the Wires
The next step is to connect the wires from the garage door opener to the motor unit. The wires are color-coded, so it's important to connect them correctly. The following table shows which wires should be connected to which terminals:
| Wire Color | Terminal |
|---|---|
| Black | Line 1 |
| White | Line 2 |
| Red | Travel Limit |
| Green | Ground |
5. Secure the Wires
Once the wires are connected, you need to secure them so that they don't come loose. You can do this by using electrical tape or wire nuts.
6. Reconnect the Battery
If your garage door opener has a battery backup, now is the time to reconnect it. The battery backup will provide power to the opener in the event of a power outage.
7. Plug in the Opener
Now you can plug the garage door opener back into the power outlet. The opener will automatically start to learn the travel limits of your garage door.
8. Test the Opener
Once the opener has learned the travel limits, it's time to test it to make sure it's working properly. Press the button on the remote control to open the garage door. The door should open smoothly and evenly. Once the door is fully open, press the button again to close it.
9. Troubleshooting
If you're having problems getting your LiftMaster garage door opener to work, here are a few troubleshooting tips:
- Make sure that the wires are connected correctly.
- Check the battery backup to make sure it's connected and charged.
- Reset the opener by pressing the reset button on the control panel.
- Contact LiftMaster customer support for assistance.

How To Connect A Liftmaster Next Generation Garage Door Opener In The Myq App With Diagnostics Youtube

How To Connect Liftmaster Garage Door Opener Wifi With Myq App

How To Program A Liftmaster Garage Door Opener Remote

How To Set Up Your Liftmaster Secure View Belt Drive Wi Fi Garage Door Opener In The Myq App

Learn Button On A Liftmaster Garage Door Opener Doorvana Doors

How To Connect A Liftmaster Garage Door Opener With Myq Socal Repair Inc Irvine Ca

How To Connect Liftmaster Garage Door Opener Wifi With Myq App Internet Setup

Connecting The Garage Door Control Wire

How To Erase And Program Liftmaster Garage Door Remote 604 757 6557

How To Set Up A Liftmaster Chamberlain Wi Fi Garage Door Opener Surety Support Forum
See Also