How To Replace Garage Door Springs and Cables
Garage doors, while seemingly simple in operation, rely on a complex interplay of components to function safely and efficiently. Among the most critical of these are the springs and cables. These elements work in tandem to counterbalance the weight of the door, allowing for smooth and controlled opening and closing. When either the springs or cables fail, the door becomes significantly harder to operate and can pose a serious safety hazard. Replacing these components is a task best approached with caution and a thorough understanding of the process. This article outlines the steps involved in replacing garage door springs and cables, emphasizing safety precautions and best practices.
It is crucial to understand that working with garage door springs is inherently dangerous. The springs are under immense tension, and improper handling can result in severe injury or even death. If there is any hesitation or uncertainty about any step outlined below, it is strongly recommended to contact a qualified garage door technician. Attempting this repair without the necessary knowledge and tools can be a costly and potentially life-altering mistake.
Before beginning any work, it is imperative to gather the necessary tools and materials. This includes the correct replacement springs and cables (matching the specifications of the existing components), winding bars, adjustable wrench, socket set, pliers, safety glasses, work gloves, and a sturdy ladder. It is highly recommended to purchase springs and cables from a reputable supplier, ensuring high-quality components that meet industry standards. The springs are typically identified by their length, wire gauge, and inside diameter. Matching these specifications precisely is critical for proper door balance and safe operation.
Identifying and Sourcing the Correct Replacement Parts
Accurate identification of the existing springs and cables is the first step in the replacement process. The springs are typically located above the garage door opening, either as a single spring in the center (typically torsion springs) or as two springs mounted on either side of the door (often extension springs). It is important to note the type of spring system being used before ordering replacement parts. For torsion springs, measure the length of the spring, the inside diameter, and the wire gauge. The wire gauge can be determined by measuring the number of coils per inch. For extension springs, measuring the length (unstretched) and the diameter of the spring is crucial. Also note the weight capacity identified by the painted color on the spring ends. The cables are generally measured by their length and diameter. Damaged cables should be inspected for any fraying or wear, as this can indicate a potential point of failure.
When sourcing replacement parts, consider purchasing from a reputable supplier specializing in garage door components. This ensures that the replacements meet safety standards and will provide reliable performance. Provide the supplier with the measurements and specifications obtained from the existing springs and cables to ensure a proper match. Using incorrect springs can lead to improper door balance, premature wear, and potentially dangerous situations.
Always replace both springs at the same time, even if only one appears to be broken. This is because the existing spring has already experienced wear and tear. Replacing only one spring will result in uneven tension and can cause the new spring to fail prematurely, potentially leading to further damage and a higher overall cost in the long run.
Replacing Torsion Springs
Torsion springs are under significant tension and require specialized procedures to safely remove and replace. The following steps outline the process, but it is crucial to emphasize the importance of extreme caution.
First, ensure the garage door is fully closed. Secure the door in the closed position using clamps or locking pliers attached to the track just above the rollers. This prevents the door from unexpectedly opening during the spring replacement process. Disconnect the garage door opener by unplugging it from the power outlet. This eliminates the risk of accidental activation of the opener, which could lead to serious injury.
Next, insert the winding bars into the winding cone of the spring. Loosen the setscrews on the winding cone using an adjustable wrench. With the winding bars securely in place, carefully unwind the spring, one quarter turn at a time. Use one winding bar to hold the spring in place while using the other to release tension. This process requires patience and control. Releasing the tension too quickly can cause the winding bars to slip, resulting in a dangerous recoil of the spring.
Once the spring is fully unwound, remove the winding bars and loosen the setscrews on the stationary cone. Slide the spring off the torsion tube, taking note of the orientation of the spring for proper installation of the new spring. Inspect the torsion tube for any signs of damage or wear. If necessary, replace the torsion tube before installing the new springs.
Install the new spring onto the torsion tube, ensuring it is oriented correctly. Secure the stationary cone with the setscrews. Insert the winding bars into the winding cone and begin winding the spring. The number of turns required depends on the height of the garage door and the spring's specifications. Consult the spring manufacturer's instructions for the correct winding procedure. As a general guideline, a standard 7-foot door typically requires approximately 35 quarter turns.
After winding the spring, tighten the setscrews on the winding cone while holding the spring in place with the winding bars. Carefully remove the winding bars. Lubricate the spring with a garage door lubricant to ensure smooth operation. Repeat the process for the other spring, if applicable. Finally, remove the clamps or locking pliers securing the door and reconnect the garage door opener. Test the door to ensure it operates smoothly and is properly balanced.
Replacing Cables
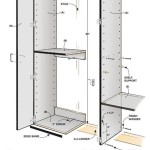
Garage door cables work in conjunction with the springs to lift and lower the door. They run from the bottom corner brackets of the door, up and around a cable drum (for torsion spring systems) or through a pulley (for extension spring systems), and attach to a bracket or anchor point. Replacing the cables requires careful attention to detail and proper tensioning to ensure the door operates safely and correctly.
With the garage door still secured in the closed position and the springs de-tensioned (as described above), detach the cable from the bottom bracket. This is typically done by loosening the fasteners securing the cable end to the bracket. Exercise caution, as the cable may be under some residual tension.
Remove the old cable from the cable drum (for torsion spring systems) or pulley (for extension spring systems). Inspect the drum or pulley for any signs of wear or damage. If necessary, replace the drum or pulley before installing the new cable.
Install the new cable by routing it around the drum or pulley and attaching it to the bottom bracket. Ensure the cable is properly seated in the grooves of the drum or pulley. Tighten the fasteners on the bottom bracket to secure the cable end.
With the new cable installed, it is necessary to properly tension the cable. For torsion spring systems, this is typically achieved by winding the spring as described above. As the spring is wound, the cable will be drawn taut around the cable drum. For extension spring systems, the cable tension is adjusted by manually stretching the spring and securing the cable to a bracket or anchor point. The precise tensioning procedure varies depending on the type of spring system. Refer to the manufacturer's instructions for the correct tensioning procedure.
Repeat the process for the other cable. Ensure that both cables are equally tensioned to maintain proper door balance. Remove the clamps or locking pliers securing the door and reconnect the garage door opener. Test the door to ensure it operates smoothly and is properly balanced. Pay attention to whether the door moves smoothly up and down, and if the door travels to the correct closed position without any issues or binding. If any of this is not working as intended, refer to the garage door manual for troubleshooting.
After completing the spring and cable replacement, it is essential to thoroughly inspect the entire garage door system. Check the rollers, hinges, tracks, and opener for any signs of wear or damage. Lubricate all moving parts with a garage door lubricant to ensure smooth operation and prevent premature wear. Regularly inspect the springs and cables for any signs of fraying, corrosion, or wear. Replace any damaged components promptly to prevent further damage and ensure the safety of the garage door system.

How To Replace Garage Broken Door Extension Spring Safety And Pulley Cables Step By

How To Replace A Garage Door Spring

How To Change A Garage Door Spring

How To Replace Garage Door Cables Fix Doors Ca

How To Replace A Garage Door Cable Winston Doors

How To Replace Both Cables On A Garage Door Torsion Spring System

Garage Door Cable 101 Repair Set Up Replacement 2025 Today S Homeowner

Garage Door Spring And Cable Repair Diy Family Handyman

How To Safely Replace Garage Door Springs Save Hundreds

How To Repair A Garage Door Springs And Cables