How To Put Up Shelves In Your Garage
A well-organized garage is a homeowner’s dream. It provides ample storage space for tools, seasonal items, and other belongings, keeping your home clutter-free. One of the most effective ways to maximize garage storage is by installing shelves. While it might seem like a daunting task, putting up shelves in your garage is a DIY project that can be accomplished with a little planning and effort.
1. Plan Your Shelves
The first step in putting up shelves in your garage is planning the layout. Consider the size of your garage, the items you intend to store, and the weight they will exert on the shelves.
Determine Shelf Size:
Measure the available wall space, taking into account existing features like doors, windows, and electrical outlets. Decide on the number of shelves you need, their width, and depth. Consider the items you plan to store and select shelf dimensions that accommodate them.
Choose Shelf Material:
Garage shelves are commonly made from wood, metal, or plastic. Wood is a durable and aesthetically pleasing option, but it can be susceptible to moisture damage. Metal shelves are sturdy and resistant to rust, making them suitable for heavier items. Plastic shelves offer a lightweight and affordable choice, but they may not be as robust.
Decide on Shelf Placement:
Once you know the size and material of your shelves, determine their placement on the wall. Consider the height of the shelves, ensuring they are accessible for easy storage and retrieval. Mark the wall with a pencil to indicate the location of each shelf bracket.2. Gather Your Supplies
Once you have a plan, gather the necessary materials and tools. This includes:
Shelves:
Purchase the pre-made shelves or materials to build your own.
Shelf Brackets:
Choose sturdy brackets designed to support the weight of your items.
Stud Finder:
Locate the wall studs where you will attach the brackets.
Level:
Ensure your shelves are installed properly, with a level.
Measuring Tape:
Measure and mark the shelf locations accurately.
Pencil:
Mark the wall for shelf bracket placement.
Drill:
Drill pilot holes and attach the brackets to the wall.
Screws:
Secure the brackets to the wall studs.
Safety Glasses:
Protect your eyes from debris.
Work Gloves:
Protect your hands while working.3. Install the Shelves
With your planning completed and supplies gathered, you are ready to begin installation.
Locate Wall Studs:
Use a stud finder to locate the wall studs where you will attach the shelf brackets.
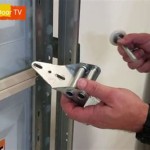
Attach Brackets:
Mark the wall with a pencil at the locations where you will attach the shelf brackets, ensuring they are level. Drill pilot holes at the marked locations, and then attach the brackets to the wall using screws.
Secure Shelves:
Once the brackets are in place, carefully place the shelves onto the brackets. Check that they are level and stable before loading them with items.
Additional Tips:
- If you need to install shelves in a garage with drywall, you can use specialized drywall anchors or toggle bolts to secure the brackets.
- If your garage is exposed to moisture, consider using weather-resistant materials for your shelves and brackets.
- To add extra strength to your shelves, you can use additional supports or reinforcement strips.
- To give your garage a more polished look, consider painting the shelves or using decorative brackets.
Installing shelves in your garage can be a rewarding DIY project that not only offers ample storage space but also improves the overall organization and functionality of your garage.

How To Build Garage Shelving Easy Cheap And Fast Youtube

How To Build Shelving In A Garage Three Ways Ana White

How To Build Garage Shelving Easy Cheap And Fast Youtube

How To Build Diy Garage Shelving Young House Love

How To Build Garage Storage Shelves By Yourself Queen Bee Of Honey Dos

Easy To Build Diy Garage Shelves S And Ideas

3 Ways To Build Garage Shelving Wikihow

How To Build Garage Shelves The Easy Way Infarrantly Creative

Best Diy Garage Shelves Attached To Walls Ana White

How To Build Sturdy Garage Shelves Home Improvement Stack Exchange Blog
See Also