How To Install A Garage Keypad
Installing a garage keypad offers a convenient and secure means of accessing a garage without the need for a physical key or remote. This device allows homeowners to grant access to family members, service providers, or trusted individuals by simply providing them with a unique entry code. The installation process is relatively straightforward for individuals with basic DIY skills and can be completed with common household tools. This article provides a comprehensive guide to installing a garage keypad, ensuring a smooth and successful installation experience.
Before beginning the installation process, it is crucial to gather all the necessary tools and materials. This preparation will streamline the project and minimize potential interruptions. The required items typically include:
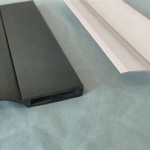
- Garage keypad kit (containing the keypad, mounting hardware, and instructions)
- Drill with various drill bits
- Screwdriver (Phillips head or flathead, depending on the screws provided)
- Wire stripper/cutter
- Pencil or marker
- Measuring tape
- Level
- Wire connectors (if required)
- Safety glasses
- Gloves (optional, but recommended)
Carefully reviewing the manufacturer's instructions included with the garage keypad kit is paramount. These instructions provide specific details about the wiring configuration, programming procedures, and any unique requirements for the particular model. Ignoring these instructions can lead to improper installation and malfunction of the keypad.
Key Point 1: Preparation and Safety Precautions
Prior to commencing any electrical work, safety should be the foremost concern. The power supply to the garage door opener must be disconnected to prevent electric shock. This is typically achieved by flipping the appropriate circuit breaker in the electrical panel. Verify that the power is off by testing the garage door opener button – it should not activate the door.
Next, the optimal location for the keypad should be determined. Factors to consider include:
- Accessibility: The keypad should be easily reachable from a vehicle and by pedestrians.
- Visibility: The keypad should be clearly visible, especially at night. Ensure adequate lighting in the area.
- Protection: The keypad should be somewhat protected from the elements (rain, snow, direct sunlight) to prolong its lifespan.
- Wiring: The location should be relatively close to the garage door opener unit to minimize the length of wiring required. Check the manufacturer's provided wire length if a wired keypad.
Once the location is selected, use a level and a pencil or marker to mark the position of the mounting holes. Accuracy at this stage is essential for a professional-looking installation.
It is highly advisable to wear safety glasses throughout the installation process to protect the eyes from dust and debris. Gloves can also be worn to provide a better grip and protect the hands.
Key Point 2: Wiring and Mounting the Keypad
The wiring process depends on whether the keypad is wired or wireless. Wireless keypads typically require batteries and communicate with the garage door opener wirelessly. Wired keypads require a direct electrical connection to the garage door opener motor.
For wired keypads, the first step is to prepare the wires. Using a wire stripper/cutter, carefully strip approximately 1/2 inch of insulation from the ends of the wires on both the keypad and the garage door opener unit. Be careful not to cut or nick the wires themselves.
The wiring configuration will be detailed in the manufacturer's instructions. Typically, there are two or three wires that need to be connected. Common wiring schemes involve connecting the keypad wires to the "learn" button terminals or the push-button terminals on the garage door opener. Use wire connectors to securely join the wires, ensuring a tight and reliable connection. Color-coded wires are often used, but it is essential to verify the proper connections in the manual.
Once the wiring is complete, carefully tuck the wires behind the keypad mounting plate. Align the mounting plate with the marked holes on the garage wall and use the provided screws to secure it. Ensure that the mounting plate is level before tightening the screws completely.
Attach the keypad to the mounting plate, following the manufacturer's instructions. Some keypads simply snap into place, while others require screws. Ensure that the keypad is securely attached and does not wobble or loosen easily.
For wireless keypads, ensure batteries are properly installed and the keypad is securely mounted to the wall using screws. Wireless keypads often have a pairing process that must be completed with the garage door opener. This process is explained in the manufacturer's manual.
Key Point 3: Programming and Testing the Keypad
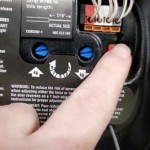
After the keypad is physically installed, it needs to be programmed with a unique entry code. The programming procedure varies depending on the specific keypad model. Refer to the manufacturer's instructions for detailed steps, paying close attention to the sequence of button presses and any specific requirements.
Typically, the programming process involves entering a master code (often found on the keypad or in the instructions), followed by the desired entry code. The entry code can be any combination of numbers, but it is recommended to choose a code that is easy to remember but difficult to guess. Avoid using common codes such as "1234" or "0000."
Once the keypad is programmed, thoroughly test it to ensure it is functioning correctly. Enter the programmed entry code and verify that the garage door opens and closes as expected. Test the keypad multiple times to confirm its reliability. If the keypad fails to operate, double-check the wiring connections, the programming steps, and the battery (if applicable). Consult the manufacturer's troubleshooting guide for additional assistance.
If the keypad has multiple user codes, program each code individually and test them all. This ensures that each user has the correct access and that the system is functioning as intended.
After successful installation of a wired keypad, restore the power to the garage door opener by flipping the circuit breaker back on. Again, test the garage door opener button to confirm that the power has been restored.
Consider providing the manufacturer's instruction manual to all users of the keypad. In addition, write down the master code in a secure location, away from the keypad, for future reference in case the entry code needs to be changed or reset.
Regularly inspect the keypad for any signs of damage or wear. Replace the batteries in wireless keypads as needed to ensure reliable operation. Periodically test the keypad to confirm that it is still functioning correctly and that the entry code has not been compromised.
Installing a garage keypad is a relatively straightforward DIY project that can significantly enhance the convenience and security of your garage. By following the steps outlined in this article and carefully reviewing the manufacturer's instructions, individuals can successfully install a garage keypad and enjoy the benefits of keyless entry.
Troubleshooting is an essential aspect of any DIY project, and the installation of a garage keypad is no exception. If encountering difficulties during the installation process, several common issues and their potential solutions should be considered. For example, if the keypad fails to activate the garage door after proper wiring and programming, the wire connections should be re-examined for tightness and proper placement. A multimeter can be used to test the continuity of the wires and confirm that the signal is reaching the garage door opener unit. Another potential issue is interference with the wireless signal for wireless keypads. Other wireless devices may cause interference, so repositioning the keypad or the garage door opener unit may be necessary. If the keypad is exposed to extreme temperatures or weather conditions, it may malfunction. Relocating the keypad to a more protected location or installing a protective cover can help prevent this issue. Also, ensure the batteries in the wireless keypad are fresh and correctly installed. The manufacturer's troubleshooting guide included with the keypad can provide valuable insights into specific issues and their solutions. In some cases, contacting a professional garage door technician may be necessary to diagnose and resolve more complex problems.
Maintaining the garage keypad is crucial for ensuring its long-term functionality and security. Regular cleaning of the keypad surface is essential to remove dirt, dust, and grime that can accumulate over time and affect the keypad's responsiveness. A soft, damp cloth can be used to gently wipe the keypad, avoiding the use of harsh chemicals or abrasive cleaners that could damage the surface. Inspect the keypad regularly for any signs of physical damage, such as cracks, loose buttons, or water intrusion. Addressing these issues promptly can prevent more significant problems in the future. For wireless keypads, the batteries should be replaced periodically to ensure reliable operation. Pay attention to any low-battery warnings or indicators and replace the batteries as soon as possible. The entry code should be changed periodically to maintain security. This is especially important if the entry code has been shared with multiple individuals or if there is any suspicion that the code has been compromised. Finally, regularly test the keypad to confirm that it is functioning correctly and that the entry code is still valid.

How To Install A Garage Door Keypad Step By Diy Guide

How To Install Garage Door Opener Keyless Entry Wireless Keypad

How To Install And Program A Garage Door Opener Keypad

How To Install A Genie Wireless Keypad For Garage Door Openers The Company

How To Install And Program A Garage Door Opener Keypad Youtube

Dad Installs A Garage Door Keypad Overhead

How To Install A Garage Door Opener Expert Tips

Easily Install A Wireless Keypad For Your Garage Door Simple Diy

Garage Door Keypad Replacement Guide All Security Equipment

How To Program Your Garage Door Keypad Sterling Llc