Genie Garage Door Sensor No Light: Troubleshooting and Understanding
Garage door sensors are an integral safety component of modern garage door systems. These sensors, typically two small units positioned near the floor on either side of the garage door opening, work by emitting an infrared beam. If the beam is interrupted—by a person, pet, or object—the sensors signal the garage door opener to stop and reverse the closing process, preventing potential injuries or damage. A common indicator of proper function is a steady light on each sensor. When one or both sensors lack this illumination, it signifies a problem that necessitates investigation and repair. This article will explore the potential causes of a Genie garage door sensor failing to light up, and provide a detailed guide to the troubleshooting process.
The Genie garage door opener, like most modern garage door systems, relies on these safety sensors to operate. A malfunction in the sensor system can manifest in several ways, including the garage door not closing, closing only partially, or opening again immediately after closing. Before attempting any repairs, it is crucial to understand the basic principles of the system and the potential risks involved. Working with electrical components carries inherent dangers, and taking the necessary safety precautions is paramount.
Understanding the Garage Door Sensor System
The garage door sensor system operates on a straightforward principle. One sensor, often referred to as the sending sensor, emits an invisible infrared beam across the garage door opening to the receiving sensor. The receiving sensor detects this beam. When the beam is uninterrupted, the receiving sensor signals the garage door opener that the path is clear, allowing the door to close safely. If the beam is broken, the receiving sensor immediately sends a signal to stop and reverse the door's movement.
The sensors are often equipped with LED indicator lights to provide visual feedback on their status. Typically, the sending sensor will have a solid green light, indicating that it is transmitting the infrared beam. The receiving sensor usually has a solid green or amber light, signifying that it is receiving the beam and the system is functioning correctly. The absence of light on one or both sensors is a clear indication of a problem that needs to be addressed.
Genie garage door sensors often have a self-diagnostic feature, with the indicator lights flashing or blinking in specific patterns to indicate the nature of the problem. Consulting the Genie garage door opener manual is crucial for interpreting these diagnostic codes. These codes can provide valuable clues and help narrow down the source of the issue.
Common Causes of a Genie Garage Door Sensor Not Lighting Up
Several potential issues can cause a Genie garage door sensor to fail to light up. These can range from simple, easily resolvable problems to more complex electrical issues requiring professional assistance. Identifying the root cause is the first step in implementing an effective solution.
One of the most frequent causes is a simple misalignment of the sensors. Even a slight shift in position can disrupt the infrared beam, preventing the receiving sensor from detecting it and causing the indicator light to go out. Obstructions in the path of the beam, such as dirt, dust, cobwebs, or even small objects, can also block the beam and trigger the same response. Power-related issues, such as a tripped circuit breaker or a loose wiring connection, can also prevent the sensors from receiving power and illuminating their indicator lights. Damaged wiring, either to the sensors themselves or within the garage door opener system, can also interrupt the electrical flow and cause the sensors to malfunction. Finally, in some cases, the sensor itself may be faulty and require replacement.
Environmental factors can also play a role. Extreme temperatures, humidity, or direct sunlight can sometimes affect the sensor's performance. Power surges can also damage the sensors' internal circuitry, leading to failure. It is also possible for insects or other small creatures to interfere with the sensors, either by building nests or by physically damaging the wiring.
It's also worthwhile to check the power outlet itself. Using a different appliance to test the outlet will ensure that the outlet is providing power. A faulty outlet could be the sole reason why the sensor is not receiving power and therefore not lighting up.
Troubleshooting Steps for a Genie Garage Door Sensor with No Light
When troubleshooting a Genie garage door sensor with no light, it's best to proceed systematically, starting with the simplest potential causes and working towards more complex issues. Here's a step-by-step guide to help you diagnose and resolve the problem:
1. Visual Inspection: Begin by visually inspecting both sensors for any obvious signs of damage, dirt, or obstructions. Check the lenses of the sensors to ensure they are clean and free of debris. Look for any loose wiring connections or signs of physical damage to the wires. Pay close attention to the area around the sensor mounting brackets to see if anything has bumped or moved them. Clear any obstructions that might be blocking the path of the infrared beam. This might include sweeping away cobwebs or moving objects that are in the way.
2. Sensor Alignment: The most common cause of a Genie garage door sensor failing to light up is misalignment. The sensors need to be perfectly aligned with each other for the infrared beam to be properly received. Carefully examine the position of both sensors to ensure they are facing each other directly. Use a level to verify that the sensors are mounted at the same height. If the sensors are misaligned, gently adjust them until they are pointing directly at each other. Many sensors will have an adjustment screw or knob that allows for fine-tuning. After adjusting the sensors, check to see if the indicator lights illuminate.
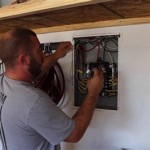
3. Wiring Inspection: Inspect the wiring connected to both sensors and the garage door opener. Look for any loose connections, frayed wires, or signs of damage. Ensure that all wires are securely connected to their respective terminals. If you find any loose connections, tighten them carefully. If you see any damaged wires, they may need to be replaced. Before working on any electrical components, always disconnect the power to the garage door opener at the circuit breaker.
4. Power Check: Verify that the garage door opener is receiving power. Check the circuit breaker to ensure it has not tripped. If the breaker has tripped, reset it. If the breaker trips again immediately, there may be a more serious electrical problem that requires professional attention. Use a multimeter to test the voltage at the sensor terminals to ensure they are receiving the correct voltage. Consult the Genie garage door opener manual for the specific voltage requirements.
5. Sensor Testing: If the visual inspection, alignment check, wiring inspection, and power check do not reveal the problem, the sensor itself may be faulty. In some cases, individual sensors can be tested using a multimeter to check for continuity. However, this requires some electrical knowledge and should only be attempted by someone comfortable working with electrical components. The easiest way to test the sensors is typically to replace them with new ones. Sensors are relatively inexpensive and can be purchased at most home improvement stores or online retailers. Before replacing the sensors, make sure to disconnect the power to the garage door opener.
6. Diagnostic Codes: Genie garage door openers often have a self-diagnostic feature that displays error codes through flashing lights or beeping sounds. Consult the Genie garage door opener manual to understand the meaning of any error codes. These codes can provide valuable clues about the nature of the problem and help narrow down the source of the issue. For example, a specific flashing pattern might indicate a misalignment issue, while another pattern might indicate a wiring problem.
7. Interference Check: While less common, interference from other devices can sometimes disrupt the sensor's operation. This is especially true in cases where there are other wireless devices operating in the same frequency range. Try temporarily disabling any nearby wireless devices, such as cordless phones or Wi-Fi routers, to see if they are interfering with the sensors. If disabling these devices resolves the issue, you may need to relocate them or change their operating frequency.
8. Consult the Manual: The Genie garage door opener manual is a valuable resource for troubleshooting problems. It contains detailed information about the system's components, wiring diagrams, and diagnostic codes. Consult the manual for specific instructions on troubleshooting sensor-related issues.
9. Professional Assistance: If you have exhausted all of the above troubleshooting steps and the Genie garage door sensor still does not light up, it may be necessary to seek professional assistance. A qualified garage door technician can diagnose and repair more complex electrical or mechanical problems. Attempting to repair complex electrical issues without the proper knowledge and experience can be dangerous and could potentially damage the garage door opener system.
By following these steps in a methodical manner, it is often possible to identify and resolve the issue causing the Genie garage door sensor to fail to light up. However, safety should always be the top priority. If you are uncomfortable working with electrical components or are unsure about any of the troubleshooting steps, it is best to consult a qualified professional.
Preventative Measures to Ensure Sensor Longevity
While troubleshooting is essential, preventative maintenance can significantly extend the lifespan of your Genie garage door sensors and minimize the likelihood of future problems. Regular cleaning of the sensor lenses is crucial. Use a soft, dry cloth to gently wipe away any dust, dirt, or cobwebs that may have accumulated. Avoid using harsh chemicals or abrasive cleaners, as these can damage the lenses. Periodically check the sensor alignment to ensure they are still properly aligned. Even minor vibrations or bumps can shift the sensors out of alignment over time. Inspect the wiring connections regularly to ensure they are secure and free of corrosion. Tighten any loose connections and replace any damaged wires. Consider installing surge protection to protect the sensors from power surges, which can damage their internal circuitry. Keep the area around the sensors clear of obstructions. This includes trimming any vegetation that may be growing in front of the sensors and removing any objects that might block the path of the infrared beam. Finally, lubricating the moving parts of the garage door system, including the hinges and rollers, can help to reduce vibrations and prevent the sensors from shifting out of alignment. These simple preventative measures can help to ensure that your Genie garage door sensors continue to function properly for years to come.

How To Fix Garage Door Sensors That Are Not Working

Genie Safe T Beams Explained The Company

Genie Garage Door Opener Not Closing Easy Fix Youtube

Safe T Beam Garage Door Opener Safety Sensors

Genie Garage Door Won T Close Unusual Sensor Issue Youtube

Genie Garage Door Opener Sensor In The Parts Accessories Department At Lowes Com

Li Garage Door Opener With Genie Silentmax 1000 Connected But Won T Open Devices Integrations Smartthings Community

Genie Garage Door Opener Replacement Safe T Beam Sensors Kit

Genie Safe T Beam Garage Door Safety Sensors Replacement Kit For Openers Gstb R The Home

How To Adjust Tension Sensor On Garage Door Fibos