Craftsman 1/2 HP Garage Door Opener Remote Replacement: A Comprehensive Guide
The Craftsman 1/2 HP garage door opener is a widely used and reliable system for automating garage access. Like all electronic devices, its components, including the remote control, can malfunction or become lost, necessitating replacement. Understanding the process of replacing a Craftsman 1/2 HP garage door opener remote is crucial for maintaining convenient and secure access to the garage.
This article will provide a detailed explanation of the steps involved in replacing a Craftsman 1/2 HP garage door opener remote, covering compatibility, programming, troubleshooting, and security considerations. This information is intended for homeowners and individuals responsible for maintaining garage door systems.
Understanding Remote Compatibility
Before initiating any replacement process, it's essential to ascertain the correct remote that is compatible with the specific Craftsman 1/2 HP garage door opener model. Garage door openers operate on different radio frequencies and use various coding technologies. Using an incompatible remote will result in the inability to control the garage door.
Craftsman garage door openers typically utilize a specific frequency, often 315 MHz or 390 MHz. The frequency is usually indicated on the back of the original remote or on the garage door opener motor unit itself. Furthermore, the coding technology employed, such as Security+, rolling code, or fixed code, must also match the replacement remote. Security+ is a common rolling code system that enhances security by changing the code each time the remote is used, preventing unauthorized access through code interception.
To identify the correct replacement remote, refer to the owner's manual for the garage door opener. The manual will specify the compatible remote models. Alternatively, the model number of the garage door opener can be used to search online for compatible remote replacements. Several reputable retailers and online marketplaces sell replacement remotes specifically designed for Craftsman garage door openers. When purchasing a replacement remote, ensure it is either a genuine Craftsman remote or a reliable aftermarket option that is explicitly stated to be compatible with the Craftsman 1/2 HP model. Avoid generic or unverified remotes, as they may not function correctly or pose security risks.
In some cases, the original remote may no longer be available. If this occurs, a universal remote that is compatible with Craftsman Security+ or the applicable coding technology can be used. Universal remotes often require a specific programming procedure to sync them with the garage door opener. Carefully follow the instructions provided with the universal remote to ensure proper operation.
Programming the New Remote
Once a compatible remote has been obtained, it must be programmed to communicate with the garage door opener motor unit. The programming process typically involves pressing a "Learn" button on the motor unit and then pressing a button on the remote. This synchronizes the remote's signal with the receiver in the motor unit.
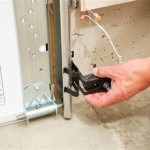
The location of the "Learn" button varies depending on the Craftsman garage door opener model. It is usually located on the back or side of the motor unit, often near the antenna wire. The button is typically colored, such as yellow, orange, or purple, to distinguish it from other buttons or components. Refer to the owner's manual for the specific location of the "Learn" button on the respective model.
Before initiating the programming process, ensure that the garage door is closed and that the area around the garage door opener is clear. This is to prevent any accidental operation of the door during programming, which could lead to injury or damage.
The following are general steps for programming a Craftsman garage door opener remote:
- Locate the "Learn" button on the garage door opener motor unit.
- Press and release the "Learn" button. An indicator light near the button will usually illuminate to indicate that the unit is in learning mode. This learning mode typically lasts for 30 seconds.
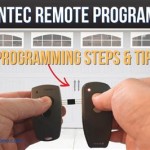
- Within 30 seconds of pressing the "Learn" button, press and hold the button on the remote that is intended to control the garage door.
- Release the remote button when the garage door opener light flashes or when the garage door moves slightly. This indicates that the remote has been successfully programmed.
- Test the remote by pressing the programmed button. The garage door should open or close in response.
If the remote does not function after following these steps, repeat the programming process. Ensure that the "Learn" button is pressed correctly, and that the remote button is held down for the appropriate duration. If the remote still does not work, consult the troubleshooting section below or refer to the owner's manual for further assistance.
For Security+ 2.0 models, the programming process may involve additional steps or variations. It is crucial to consult the owner's manual for the specific programming instructions for the particular remote and garage door opener model. Security+ 2.0 systems often require holding the remote button down for a longer duration or pressing it multiple times during the programming process.
Troubleshooting Common Issues
Several issues can arise during the remote replacement and programming process. Addressing these issues promptly is important to restore proper garage door operation. Common problems include the remote not programming, the remote having limited range, and interference from other devices.
If the remote fails to program, verify the following:
Compatibility:
Ensure that the replacement remote is compatible with the Craftsman 1/2 HP garage door opener model, including the frequency and coding technology.Battery:
Check the battery in the remote. A weak or dead battery can prevent the remote from transmitting a signal. Replace the battery with a new one of the correct type.Proximity:
Position the remote close to the garage door opener motor unit during the programming process. Being too far away can hinder the signal transmission.Learn Button Activation:
Confirm that the "Learn" button on the motor unit is functioning correctly. Pressing the button should activate the learning mode, indicated by an illuminated indicator light. If the indicator light does not illuminate, the "Learn" button may be faulty and require replacement.Obstructions:
Ensure there are no obstructions between the remote and the motor unit. Metal objects or thick walls can interfere with the radio signal.Erasing Previous Codes:
In some cases, the garage door opener may have reached its memory capacity for programmed remotes. The owner's manual should provide instructions on how to erase existing codes to make room for the new remote.
If the remote has limited range, meaning it only works when held very close to the garage door opener, consider the following:
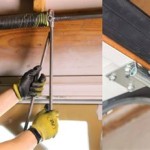
Antenna:
Check the antenna wire on the garage door opener motor unit. Ensure that it is properly connected and that it is not damaged or obstructed. Extending the antenna can improve the remote's range.Interference:
Identify potential sources of interference in the vicinity. Other electronic devices, such as wireless routers, cordless phones, or security systems, can interfere with the remote's signal. Try repositioning these devices or turning them off temporarily to see if the remote's range improves.Remote Location:
Experiment with different locations for the remote in the vehicle. Metal parts of the vehicle can block or interfere with the signal.
If the garage door opener operates erratically or opens and closes on its own, it may be due to interference or a malfunctioning circuit board. In this case, consider the following:
Inspect Wiring:
Check the wiring connections to the garage door opener motor unit for any loose or damaged wires.Consult a Professional:
If the problem persists, consult a qualified garage door technician. A faulty circuit board or other internal component may require replacement.
By systematically troubleshooting these common issues, most remote replacement problems can be resolved effectively.
Security Considerations
Replacing a garage door opener remote introduces security considerations that must be addressed. Ensuring that unauthorized individuals cannot gain access to the garage is paramount, especially if the garage provides access to the home.
When replacing a lost or stolen remote, it is crucial to erase all previously programmed remotes from the garage door opener's memory. This prevents the lost or stolen remote from being used to operate the garage door. The owner's manual will provide instructions on how to erase all programmed remotes. Typically, this involves pressing and holding the "Learn" button for an extended period, such as 6 to 10 seconds, until the indicator light flashes or the motor unit emits a specific sound. Following this procedure will clear the memory of all previously programmed remotes, including the lost or stolen one.
After erasing the old codes, reprogram all remaining remotes, including the new replacement remote. This ensures that only authorized remotes can operate the garage door.
Consider using a garage door monitor or smart garage door opener system. Garage door monitors provide real-time notifications if the garage door is left open, allowing for remote monitoring and control. Smart garage door openers can be integrated with home automation systems, providing enhanced security features such as activity logs, remote access control, and integration with security cameras.
Regularly inspect the garage door and its components, including the safety sensors, to ensure they are functioning correctly. Properly functioning safety sensors will prevent the garage door from closing if an obstruction is detected, reducing the risk of injury or damage.
Avoid leaving garage door remotes visible in vehicles. This can make the vehicle a target for theft and compromise the security of the garage. Instead, consider using keypads or smartphone apps to control the garage door, or store the remote in a secure location within the vehicle.
By implementing these security measures, the risk of unauthorized access to the garage can be significantly reduced, enhancing the overall security of the home.

1 2 Replacement For Craftsman Garage Door Opener Remote Control 41a7633 Hbw7359 Ebay

1 2 For Craftsman Garage Door Opener Replacement Remote Control 41a7633 Hbw7359 Ebay

How To Program Craftsman Garage Door Opener Remote Diy 1 2 Hp And Others

Craftsman Garage Door Opener ½ Hp Chain Drive 2 Security 3 Function Remote Controls A1 Service

Sears Craftsman 139 53681 Compatible Garage Remote Control

Sears Craftsman Garage Door Remote Compatibility Chart

Genuine Sears Craftsman Garage Door Opener Remote 139 53681b Hbw1255 Case Only Ebay

Craftsman Garage Door Opener Visor Remote Control For 139 53879 K1026 Hbw1136 Ebay

Craftsman Garage Door Opener

Craftsman 1 2hp Chain Drive Garage Door Opener With Egypt Ubuy