8x7 Garage Door Replacement Panels: A Comprehensive Guide
The standard 8x7 garage door is a prevalent choice for single-car garages. Over time, however, individual panels can become damaged due to accidents, weather exposure, or simple wear and tear. Replacing damaged panels, rather than the entire door, can be a cost-effective solution. This article will provide a detailed examination of factors to consider when replacing 8x7 garage door panels, including identifying damage, selecting the appropriate replacement, and understanding the installation process.
Identifying Damage and Assessing Panel Replacement Feasibility
Before considering panel replacement, a thorough assessment of the damage is necessary. Minor dents and scratches can often be repaired without replacement using specialized tools and fillers. However, significant damage such as cracks, warping, or rust compromises the structural integrity of the panel and necessitates replacement. The severity and location of the damage are key factors in determining whether replacing the panel is a viable option.
Consider the age and condition of the other panels. If the existing panels are nearing the end of their lifespan or exhibit signs of widespread wear, replacing the entire door may prove to be a more sensible long-term investment. Replacing a single panel on an older door could result in a mismatched appearance or a disparity in structural integrity between the new and old sections.
Furthermore, checking the availability of replacement panels is crucial. Manufacturers often discontinue specific panel designs or colors after several years. If compatible replacement panels are unavailable, replacing the entire door becomes the only practical option. Before investing time and effort into searching for panels, document the manufacturer, model, and year of the existing door. This information is essential for identifying compatible replacements.
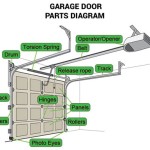
Finally, examine the condition of the door's hardware, including hinges, rollers, and tracks. If these components are also worn or damaged, replacing them concurrently with the panel is advisable. Neglecting to address these issues can compromise the functionality and safety of the door, even after the panel has been replaced.
Selecting the Correct Replacement Panels
Choosing the appropriate replacement panel for an 8x7 garage door involves several considerations. Matching the panel's material, design, thickness, and color is essential for aesthetic consistency and structural compatibility. Failure to select a compatible panel can result in an unsightly appearance and potential operational problems.
Garage door panels are commonly made from steel, aluminum, wood, or composite materials. Steel panels offer durability and security, while aluminum panels are lightweight and resistant to corrosion. Wood panels provide a classic aesthetic but require regular maintenance. Composite panels offer a balance of durability, aesthetics, and low maintenance. The replacement panel should ideally match the material of the existing panels to ensure consistent performance and appearance.
The design of the replacement panel should also align with the existing panels. Garage door panels are available in various styles, including raised panel, recessed panel, and flush panel designs. Matching the design ensures a seamless integration with the rest of the door. Pay close attention to the panel's dimensions and profile to guarantee a proper fit within the door frame.
Panel thickness is another crucial factor. Thicker panels generally offer better insulation and durability. However, using a panel with a significantly different thickness than the existing panels can disrupt the door's balance and affect its operation. Ensure that the replacement panel's thickness is compatible with the door's hardware and track system.
Color matching is often a challenging aspect of panel replacement. Even if the replacement panel is the same color as the original, slight variations in shade can occur due to weathering and fading. Consider repainting the entire door after panel replacement to ensure a uniform appearance. Professional color matching services can help minimize discrepancies between the old and new panels.
When sourcing replacement panels, consider purchasing from reputable suppliers or manufacturers. These suppliers typically offer a wider selection of panels and provide better customer support. Inspect the replacement panel thoroughly upon delivery to ensure that it is free from defects and matches the specifications.
Understanding the Installation Process
Replacing a garage door panel involves a series of steps that require careful attention to detail and adherence to safety precautions. This process typically involves disconnecting the garage door opener, removing the damaged panel, installing the new panel, and reassembling the door. Improper installation can compromise the door's functionality and safety, potentially leading to injuries or further damage.
Begin by disconnecting the garage door opener from the power source. This step is crucial to prevent accidental operation of the door during the replacement process. Use clamps or locking pliers to secure the door in the open position or enlist the help of another person to hold the door in place.
Next, detach the hinges and rollers that connect the damaged panel to the adjacent panels. Use a wrench or socket set to loosen and remove the bolts or screws securing these components. Support the weight of the panel as you detach the final hinge to prevent it from falling. Exercise caution when handling the panel, as it may be heavy and awkward to maneuver.
Carefully remove the damaged panel from the door frame. Clean the area where the new panel will be installed, removing any debris or obstructions. Inspect the hinges and rollers for wear and tear and replace them if necessary. Lubricate the rollers and hinges with a garage door lubricant to ensure smooth operation.
Position the new panel in the door frame and align it with the adjacent panels. Attach the hinges and rollers to the new panel, securing them with the appropriate bolts or screws. Ensure that the hinges and rollers are properly aligned and tightened to prevent the panel from shifting or binding. Double-check that all connections are secure before proceeding.
Once the new panel is installed, carefully lower the door and test its operation. Check for any signs of binding, misalignment, or uneven movement. If the door does not operate smoothly, adjust the hinges and rollers as needed. Reconnect the garage door opener and test its functionality. Ensure that the door opens and closes fully and that the safety features are working correctly.
After installation, inspect the door for any gaps or openings. Apply weather stripping or sealant to seal any gaps and prevent drafts or moisture intrusion. If the replacement panel is a different color than the existing panels, consider painting the entire door to achieve a uniform appearance. Finally, dispose of the damaged panel responsibly, following local regulations for waste disposal.
While panel replacement can be a DIY project for experienced homeowners, it is generally recommended to hire a professional garage door technician. Professionals have the expertise, tools, and experience to perform the replacement safely and efficiently. They can also identify and address any underlying issues that may be contributing to the panel damage.
Before hiring a professional, obtain quotes from multiple contractors and compare their prices and services. Check their credentials and ensure that they are licensed and insured. Ask for references from previous customers and review their online ratings and reviews. A reputable contractor will provide a detailed estimate of the cost, including labor and materials, and will offer a warranty on their work.
Preventative Measures and Long-Term Maintenance
To extend the lifespan of garage door panels and minimize the need for replacements, implementing preventative measures and performing regular maintenance is essential. Simple maintenance tasks, such as cleaning, lubricating, and inspecting the door, can significantly reduce the risk of damage and ensure smooth operation.
Regularly clean the garage door panels with a mild detergent and water. Remove any dirt, debris, or stains that may accumulate on the surface. Avoid using abrasive cleaners or harsh chemicals, as these can damage the panel's finish. Rinse the door thoroughly with clean water and allow it to dry completely.
Lubricate the door's moving parts, including the hinges, rollers, and tracks, with a garage door lubricant. Apply lubricant to these components every few months to ensure smooth operation and prevent friction. Avoid using oil-based lubricants, as these can attract dirt and grime. Use a silicone-based lubricant specifically designed for garage doors.
Inspect the door regularly for any signs of damage, such as rust, cracks, or warping. Address any minor issues promptly to prevent them from escalating into more significant problems. Tighten any loose bolts or screws and replace any worn or damaged components.
Trim any vegetation that may be growing near the garage door. Overhanging branches or shrubs can rub against the door and cause scratches or damage. Keep the area around the door clear of obstructions to prevent accidental collisions.
Consider installing protective measures, such as bumper guards or parking sensors, to prevent accidental damage to the garage door. These devices can help prevent collisions with vehicles or other objects, reducing the risk of dents and scratches.
By implementing these preventative measures and performing regular maintenance, homeowners can significantly extend the lifespan of their garage door panels and minimize the need for replacements. A well-maintained garage door not only enhances the curb appeal of the home but also ensures its safe and reliable operation for years to come.

Clopay Classic Steel Short Panel 9 Ft X 7 Insulated 18 4 R Value White Garage Door Without Windows Hdp20 W1 9x7 The Home

Clopay Classic Steel Short Panel 9 Ft X 7 Insulated 18 4 R Value White Garage Door Without Windows Hdp20 W1 9x7 The Home

Clopay Classic Steel Short Panel 9 Ft X 7 Insulated 18 4 R Value White Garage Door Without Windows Hdp20 W1 9x7 The Home

Precision Garage Doors Of Kansas City New Door Installation Replacement

Garage Door Tracks Track Hardware

Fresh Air Screens 97 C 9 Ft X 7 2 Zipper Garage Door Screen

Clopay Model T52s Information Technical Specifications

Bp Glass Garage Doors Explore Our Gallery Get A Quote

Steel Insulated Garage Doors Installation In Veteran Door

16 Pcs 24 X 60 Garage Door Insulation Kit Set Panels Ebay